Introduction
Welcome to the Berkeleytime Docs! This is the documentation source for developers.
tip
If you are looking for instructions to setup your local environment, go to the Local Development page
Getting Started
note
The following are instructions to set up the documentation locally. To set up the Berkeleytime app locally, go to the Local Development section.
The docs are provided as a service with the root docker-compose.yml file, so if you have the Berkeleytime app running locally, you can access the docs at http://localhost:3000/. Below are (mainly deprecated) ways of running the docs without the Berkeleytime app.
Developing and Building Locally
There are two options: with and without containerization (ie. Docker).
With Containerization (Recommended)
Using Docker allows us to build the docs without downloading dependencies on our host machine, greatly simplifying the build process.
# ./berkeleytime
# Ensure you are on the latest commit
git pull

# Build the container (only needed once every time docs/Dockerfile changes!)
docker build --target=docs-dev --tag="docs:dev" --file="./apps/docs/Dockerfile" .

# Run the container
docker run --publish 3000:3000 --volume ./docs:/docs "docs:dev"
The docs should be available at http://localhost:3000/ with live reload. To kill the container, you can use the Docker Desktop UI or run docker kill [container id]. You can find the container ID from docker ps.
tip
To change the port from the above 3000, modify the docker run command as follows, replacing the XXXX with your desired port:
docker run --publish XXXX:3000 --volume ./docs:/docs "docs:dev"
Without Containerization
To build and view the docs locally, mdBook must be installed by following the guide here. It is necessary to install Rust locally as there are dependencies that are installed with cargo. Thus, it is highly recommended to build mdbook from Rust.
# Install mdbook preprocessors with cargo
cargo install mdbook-alerts
cargo install mdbook-toc

# ./berkeleytime
# Ensure you are on the latest commit
git pull

# Navigate into the docs directory
cd docs

# Build the book and serve at http://localhost:3000/
mdbook serve --port=3000 --open
Changes in the markdown files will be shown live.
Creating Books with Markdown and mdBook
As these docs are primarily written with markdown, feel free to check this quick guide on markdown's syntax.
To add new pages to the docs, check out the mdBook guide. Below is a step-by-step guide on creating a new page:
-
Create a new
.mdfile in thesrcdirectory. For example, if you want your new page to be in the Infrastructure section, you should put the new file insrc/infrastructure. -
Add this file to
SUMMARY.md. The indentation indicates which section your file will go under. For example:- [Infrastructure](./infrastructure/README.md) - [My New File's Title](./infrastructure/my-new-file.md) -
Add content to your file and see the results!
Local Development
Quickstart
After cloning the repo, run bootstrap script from the repo root:
# ./berkeleytime
bash apps/docs/src/getting-started/bootstrap-local.sh
Optional flags:
# Skip database seeding
bash apps/docs/src/getting-started/bootstrap-local.sh --no-seed-db

# Don't start Docker services
bash apps/docs/src/getting-started/bootstrap-local.sh --no-docker
If the script completes successfully, your local development environment is fully set up. You don't need to run any of the manual steps below until GraphQL typedefs change or a new dependency is added.
Note: The script is for macOS and Linux/WSL.
Starting up the Application
The steps below are the manual alternative to the bootstrap script. Use them only if you prefer to set up manually or if the script fails.
Local development has a few local dependencies:
- Git
- Node version manager
- Docker Desktop
- pre-commit
First, set up Node locally:
nvm install --lts
After installing these dependencies, make sure you are on the main branch:
# ./berkeleytime
git pull
git switch main

# Continue installation of dependencies.
pre-commit install

# Create .env from template file
cp .env.template .env

# Setup local code editor intellisense.
npm install
npx turbo run generate
Open the docker desktop application, then run:
# Start up application
docker compose up -d
The Berkeleytime application should now be running locally at http://localhost:3000! Make sure that each page (catalog, grades, etc.) is working as expected.
Common Commands
Upon changing any GraphQL typedefs in the backend, the generated types must be regenerated:
# ./berkeleytime
npx turbo run generate
Errors can occur when installing new npm packages. If they aren't automatically reflected in an already running docker compose:
docker compose down
docker compose up --build -d
Docker Compose Profiles
By default, running docker compose up -d starts only the core stack (backend, frontend, MongoDB, Redis). Additional services are opt-in and can be enabled using Docker Compose profiles.
Profiles allow you to start only the services you need for your workflow, keeping local development less resource-intensive.
-
ag— AG frontend
→ http://localhost:3001 -
staff— Staff dashboard
→ http://localhost:3002 -
semantic-search— Semantic course search
→ http://localhost:3010 -
docs— Docs + Storybook
→ http://localhost:3003 / http://localhost:3005 -
dev— MinIO (staff photo uploads)
→ http://localhost:3006
# Start core + staff dashboard
docker compose --profile staff up -d

# Start multiple profiles
docker compose --profile ag --profile staff up -d
Ports
docker compose up will automatically setup certain services on your localhost ports. By default, DEV_PORT_PREFIX is set to 30, which means services will be available on ports starting with 30XX. You can adjust this by setting the DEV_PORT_PREFIX environment variable if you need to run multiple instances of the repository in parallel (e.g., for git worktree setups).
The following ports are used by default (DEV_PORT_PREFIX=30):
- 3000: Main frontend and backend API (via nginx)
- 3001: AG frontend (via nginx)
- 3002: Staff frontend (via nginx)
- 3003: Docs
- 3004: Redis
- 3005: Storybook
- 3006: MinIO API (requires
--profile dev) - 3007: MinIO Console (requires
--profile dev) - 3008: MongoDB
- 3009: API Sandbox (requires SIS API keys)
To use a different port prefix, set the DEV_PORT_PREFIX environment variable before running docker compose up:
DEV_PORT_PREFIX=80 docker compose up -d
Note: Currently only
DEV_PORT_PREFIX=30(default) andDEV_PORT_PREFIX=80are fully supported. Additional port prefixes require updating the Google Cloud OAuth authorized redirect URIs.
Seeding Local Database
A seeded database is required for some pages on the frontend. The bootstrap script handles this by default (use --no-seed-db to skip). The steps below are the manual alternative:
# ./berkeleytime

# Ensure the MongoDB instance is already running.
docker compose up -d

# Download the public data
curl -f -o "prod-backup.gz" "https://backups.berkeleytime.com/public/daily/prod_public_backup-$(TZ=America/Los_Angeles date -v -6H +%Y%m%d).gz"

# Copy the data, restore, and seed fake user
docker cp ./prod-backup.gz berkeleytime-mongodb-1:/tmp/prod-backup.gz
docker exec berkeleytime-mongodb-1 mongorestore --drop --gzip --archive=/tmp/prod-backup.gz
docker exec berkeleytime-mongodb-1 mongosh bt --eval 'const r = db.users.findOneAndUpdate({ email: "[email protected]" }, { $setOnInsert: { googleId: "dev-fake-public-backup", email: "[email protected]", name: "Dev User", staff: false, lastSeenAt: new Date() } }, { upsert: true, returnDocument: "after" }); print("Dev user id: " + r._id); print("Login URL: http://localhost:3000/api/dev/login?userId=" + r._id + "&redirect_uri=/");'
Note: Public backups are redacted and are not a comprehensive dataset. Use private backups (Cloudflare Access required) for full data.
Contributing
Follow the steps in Local Development to set up your environment and start working on your feature.
Once you've completed your feature, push your changes with git push and make sure all the pre-push hooks pass. You should see all checks (type-check, format, lint, build) marked as "Passed" before proceeding.
Next, create a Pull Request (PR). Make a deployment to development and ping someone on the team (your pod lead or an experienced member) to review your PR. Send them both the link to your deployment and the link to your PR.
Once they approve your PR, you should be good to merge. After merging, test your changes in staging once it is deployed (staging deploys automatically on pushes to main). Then run the production workflow.
Deploying with CI/CD
The deployment process is different for development, staging, and production environments.
- Development: Best for short-term deployments to simulate a production environment as closely as possible. Useful for deploying feature branches before merging into
main. - Staging: The last "testing" environment to catch bugs before reaching production. Reserved for the latest commit on
main. - Production: User facing website! Changes being pushed to production should be thoroughly tested on a developer's local machine and in development and staging environments.
To learn more about how our CI/CD pipelines work, head to the infra section's overview of CI/CD.
Development
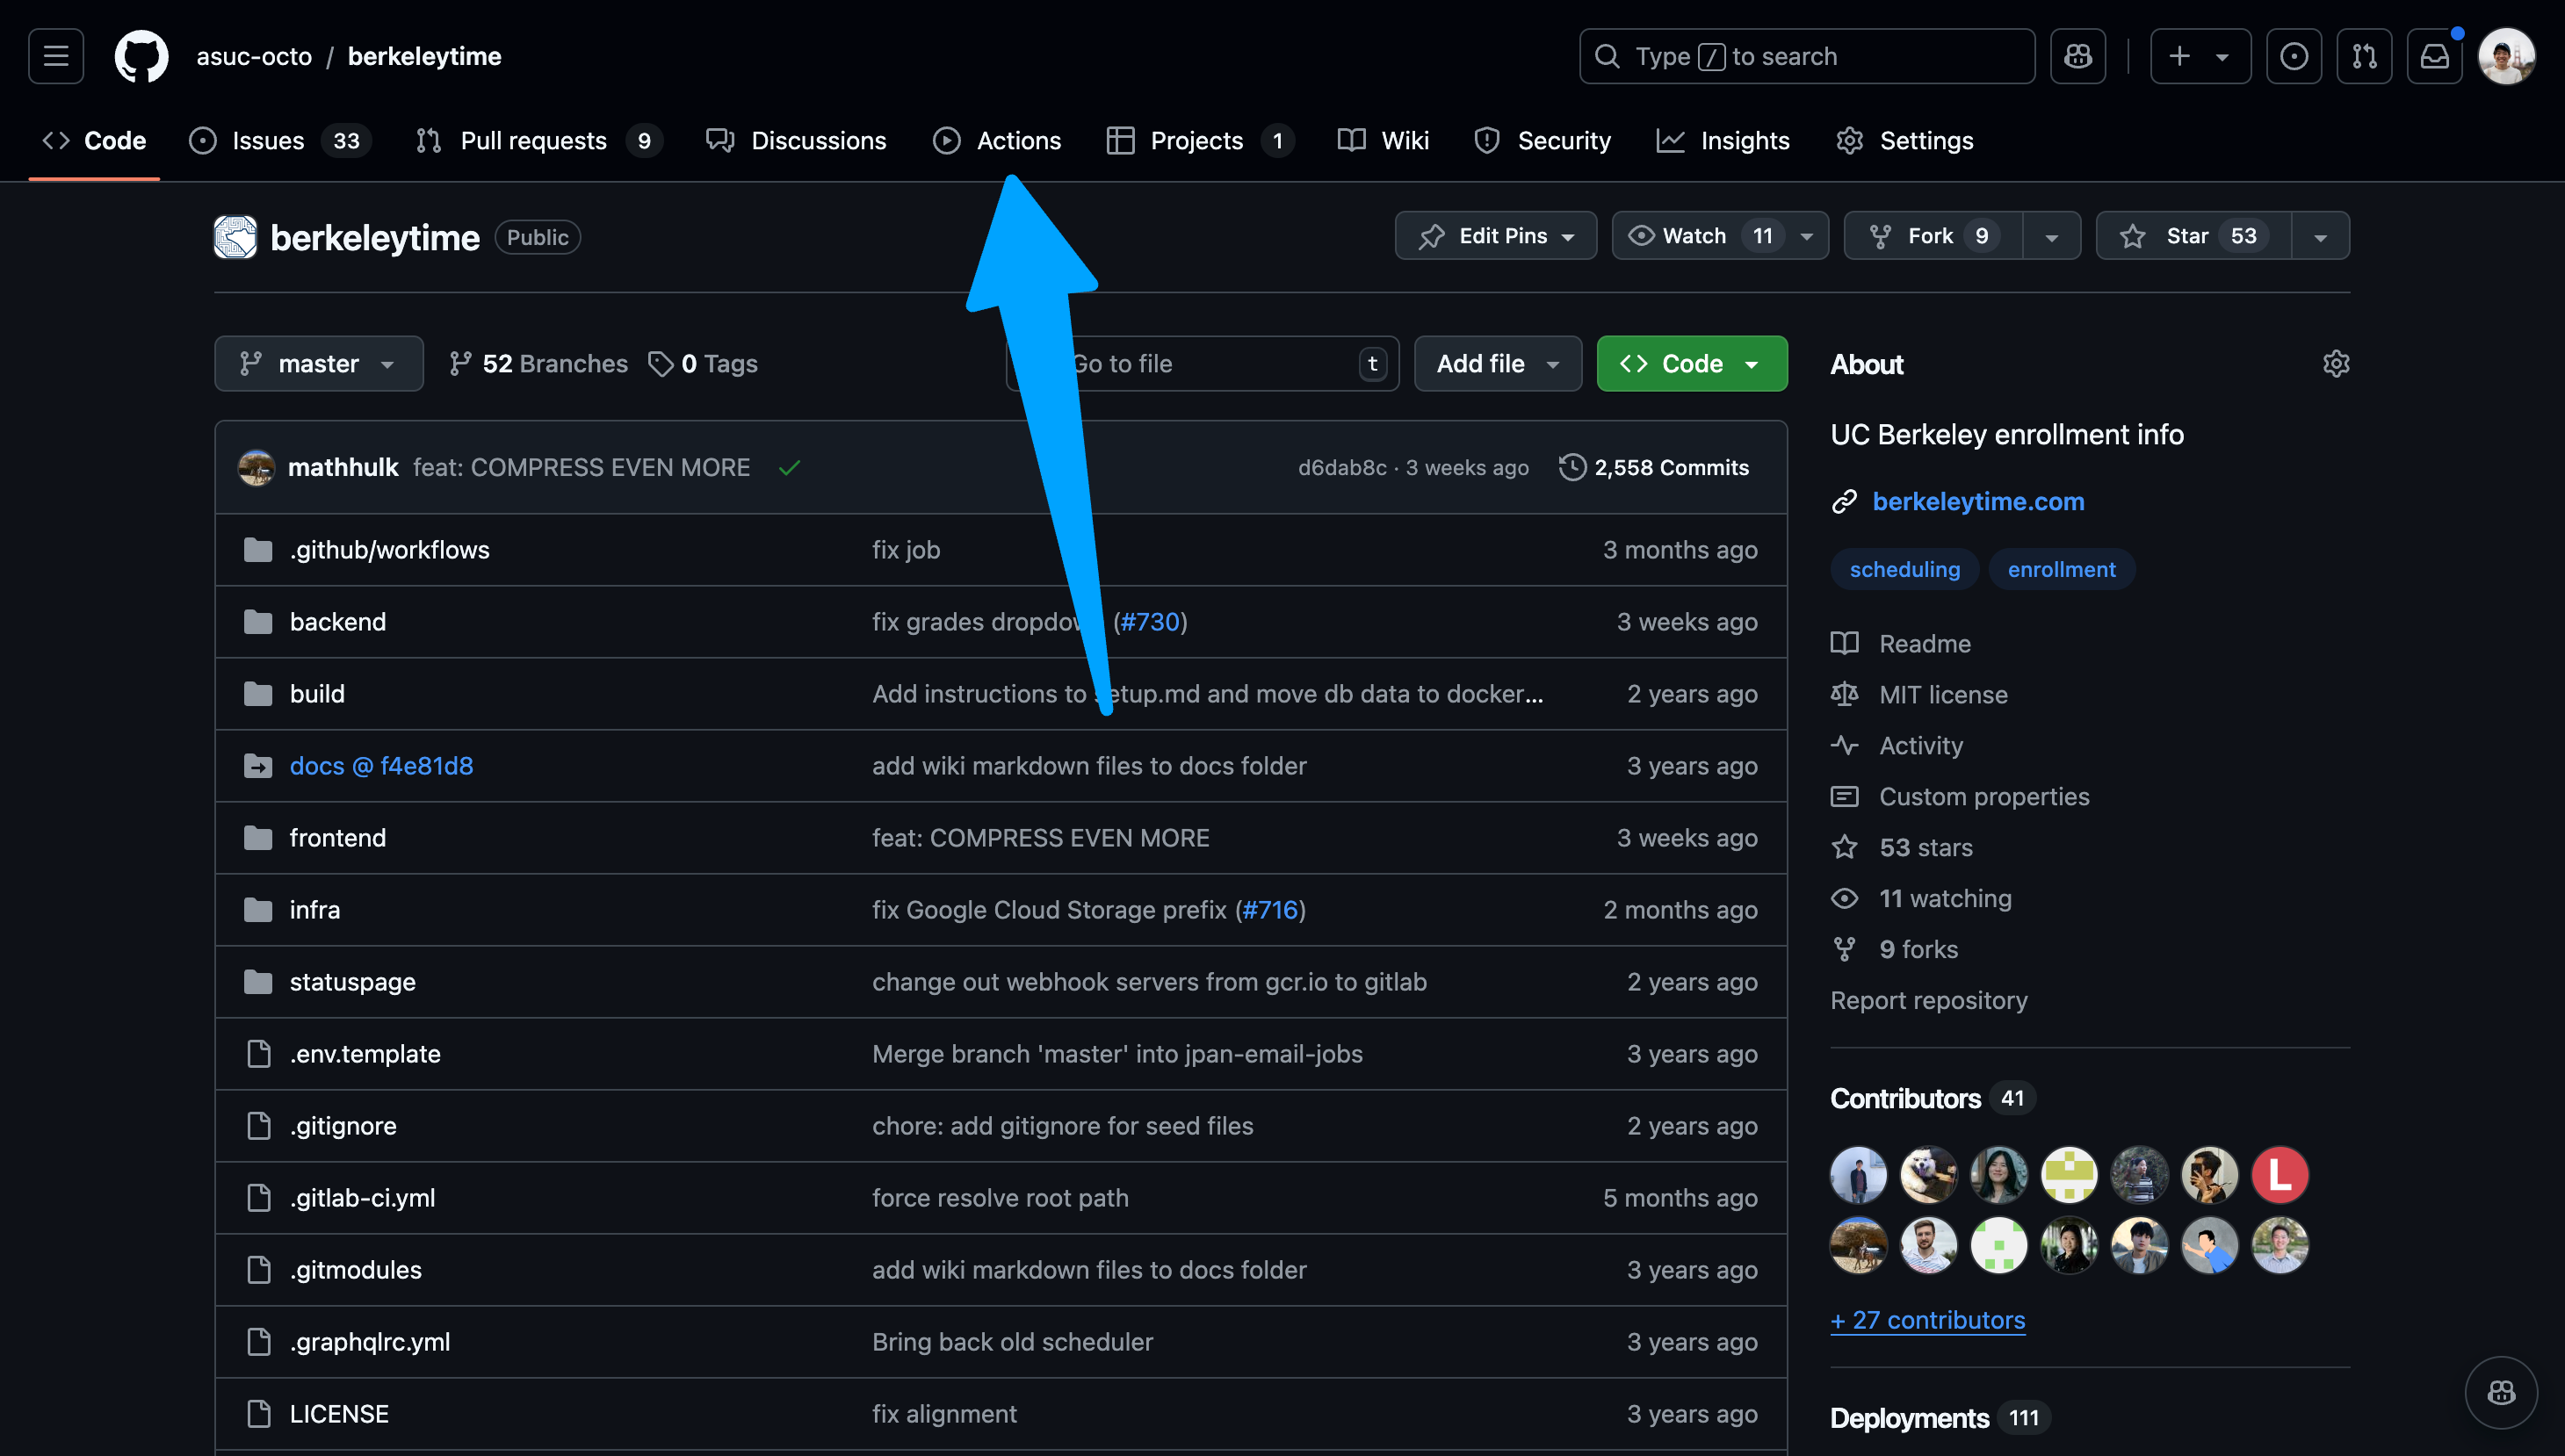
-
Go to the actions page.
Image
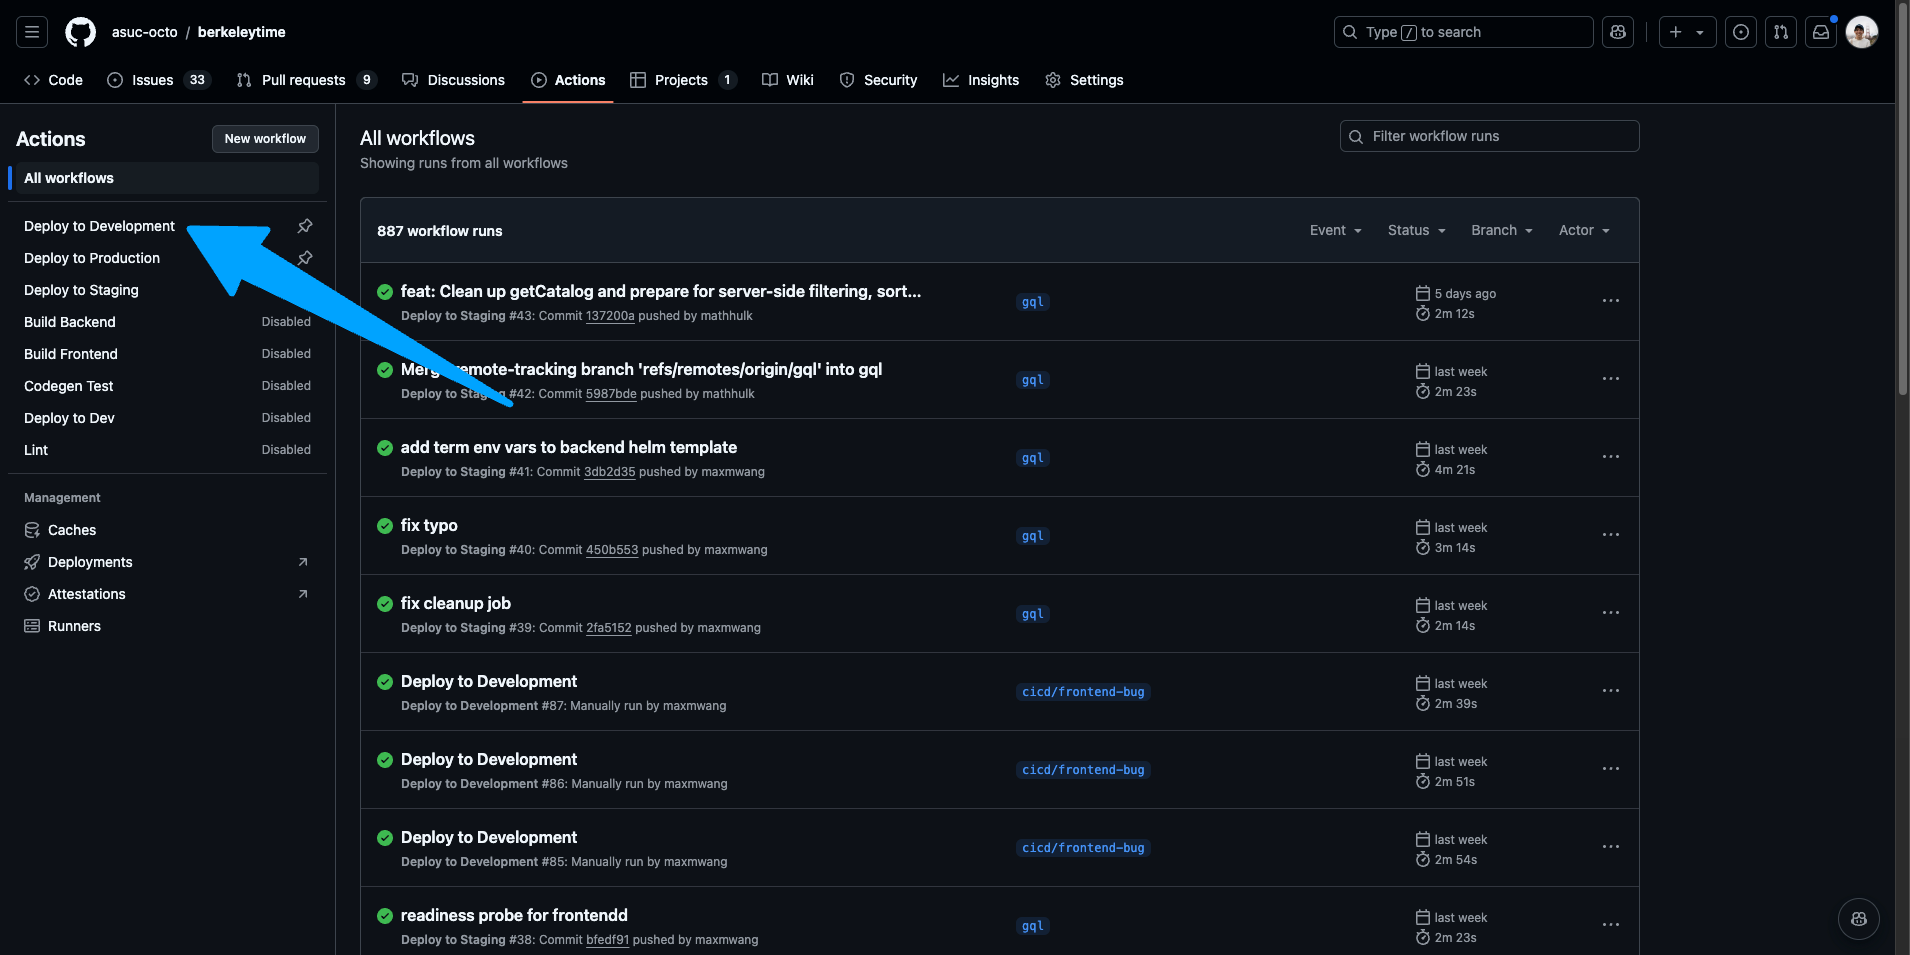
-
Ensure "Deploy to Development" is the selected action on the left sidebar.
Image
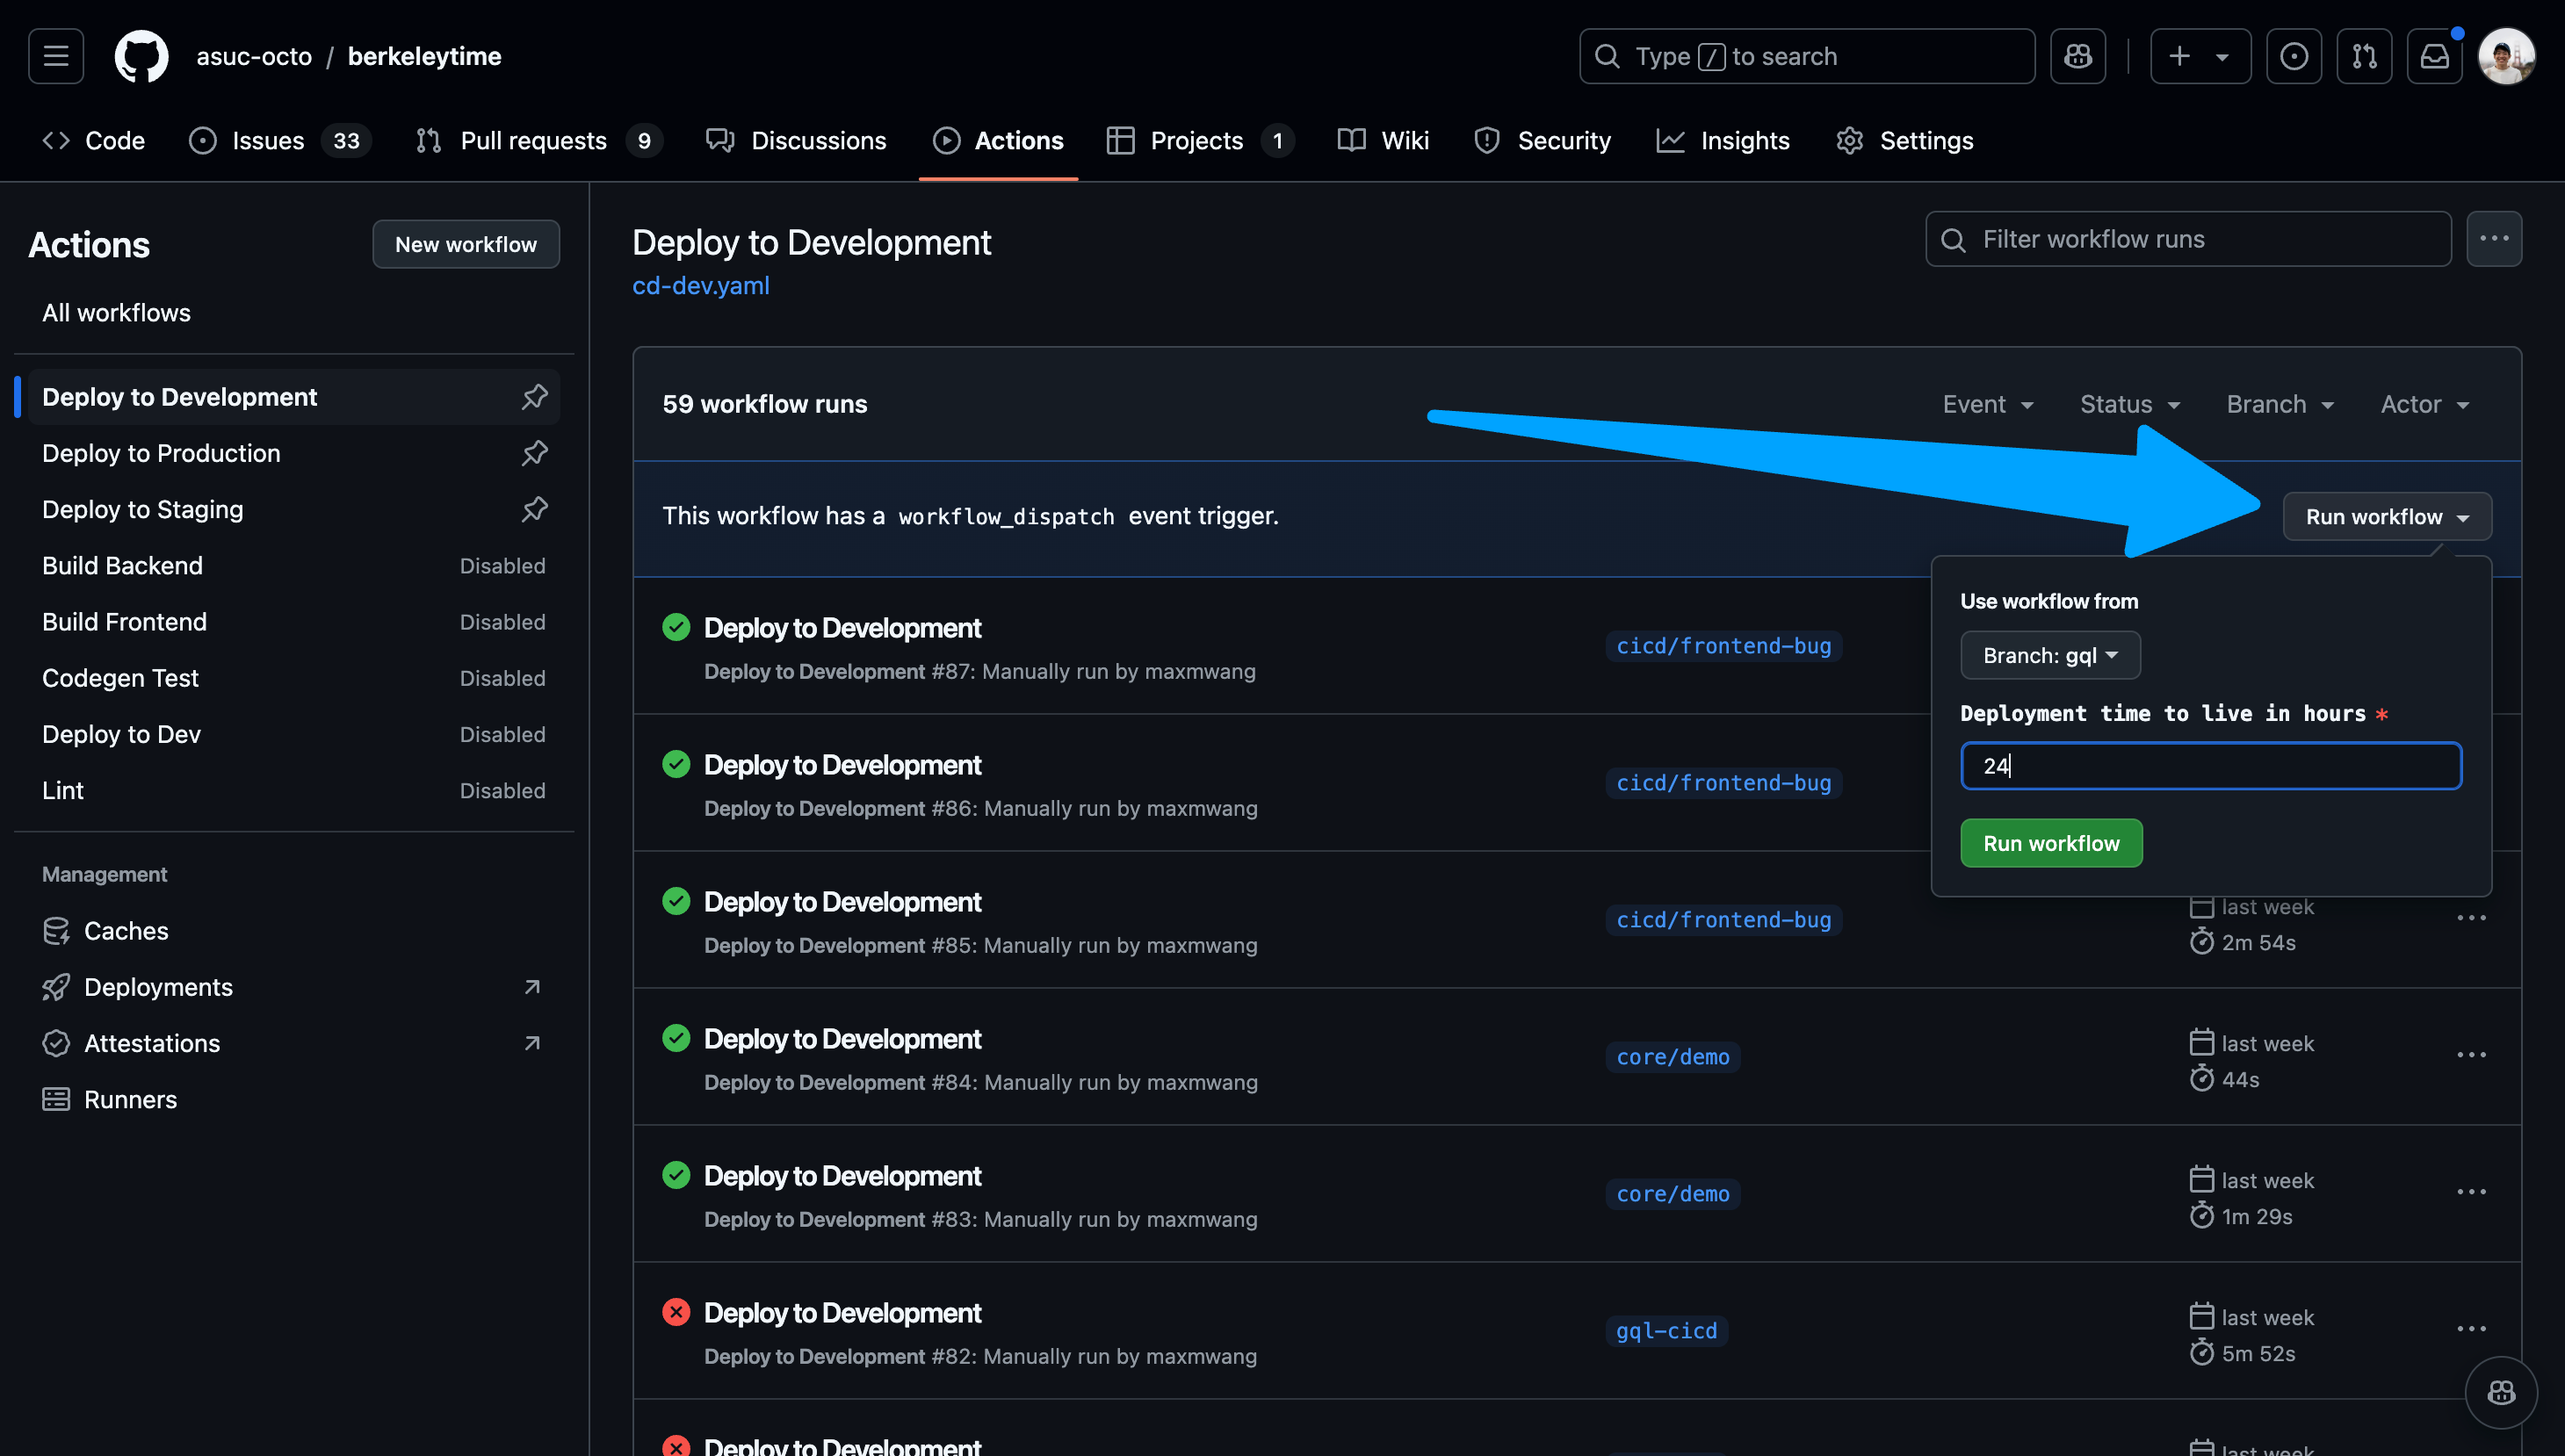
-
Navigate to the "Run workflow" dropdown on the right. Select your branch and input a time to live in hours. Please keep this value a reasonable number. If you need to login, for example you want to test a scheduler feature, select "Enable authentication support".
Image
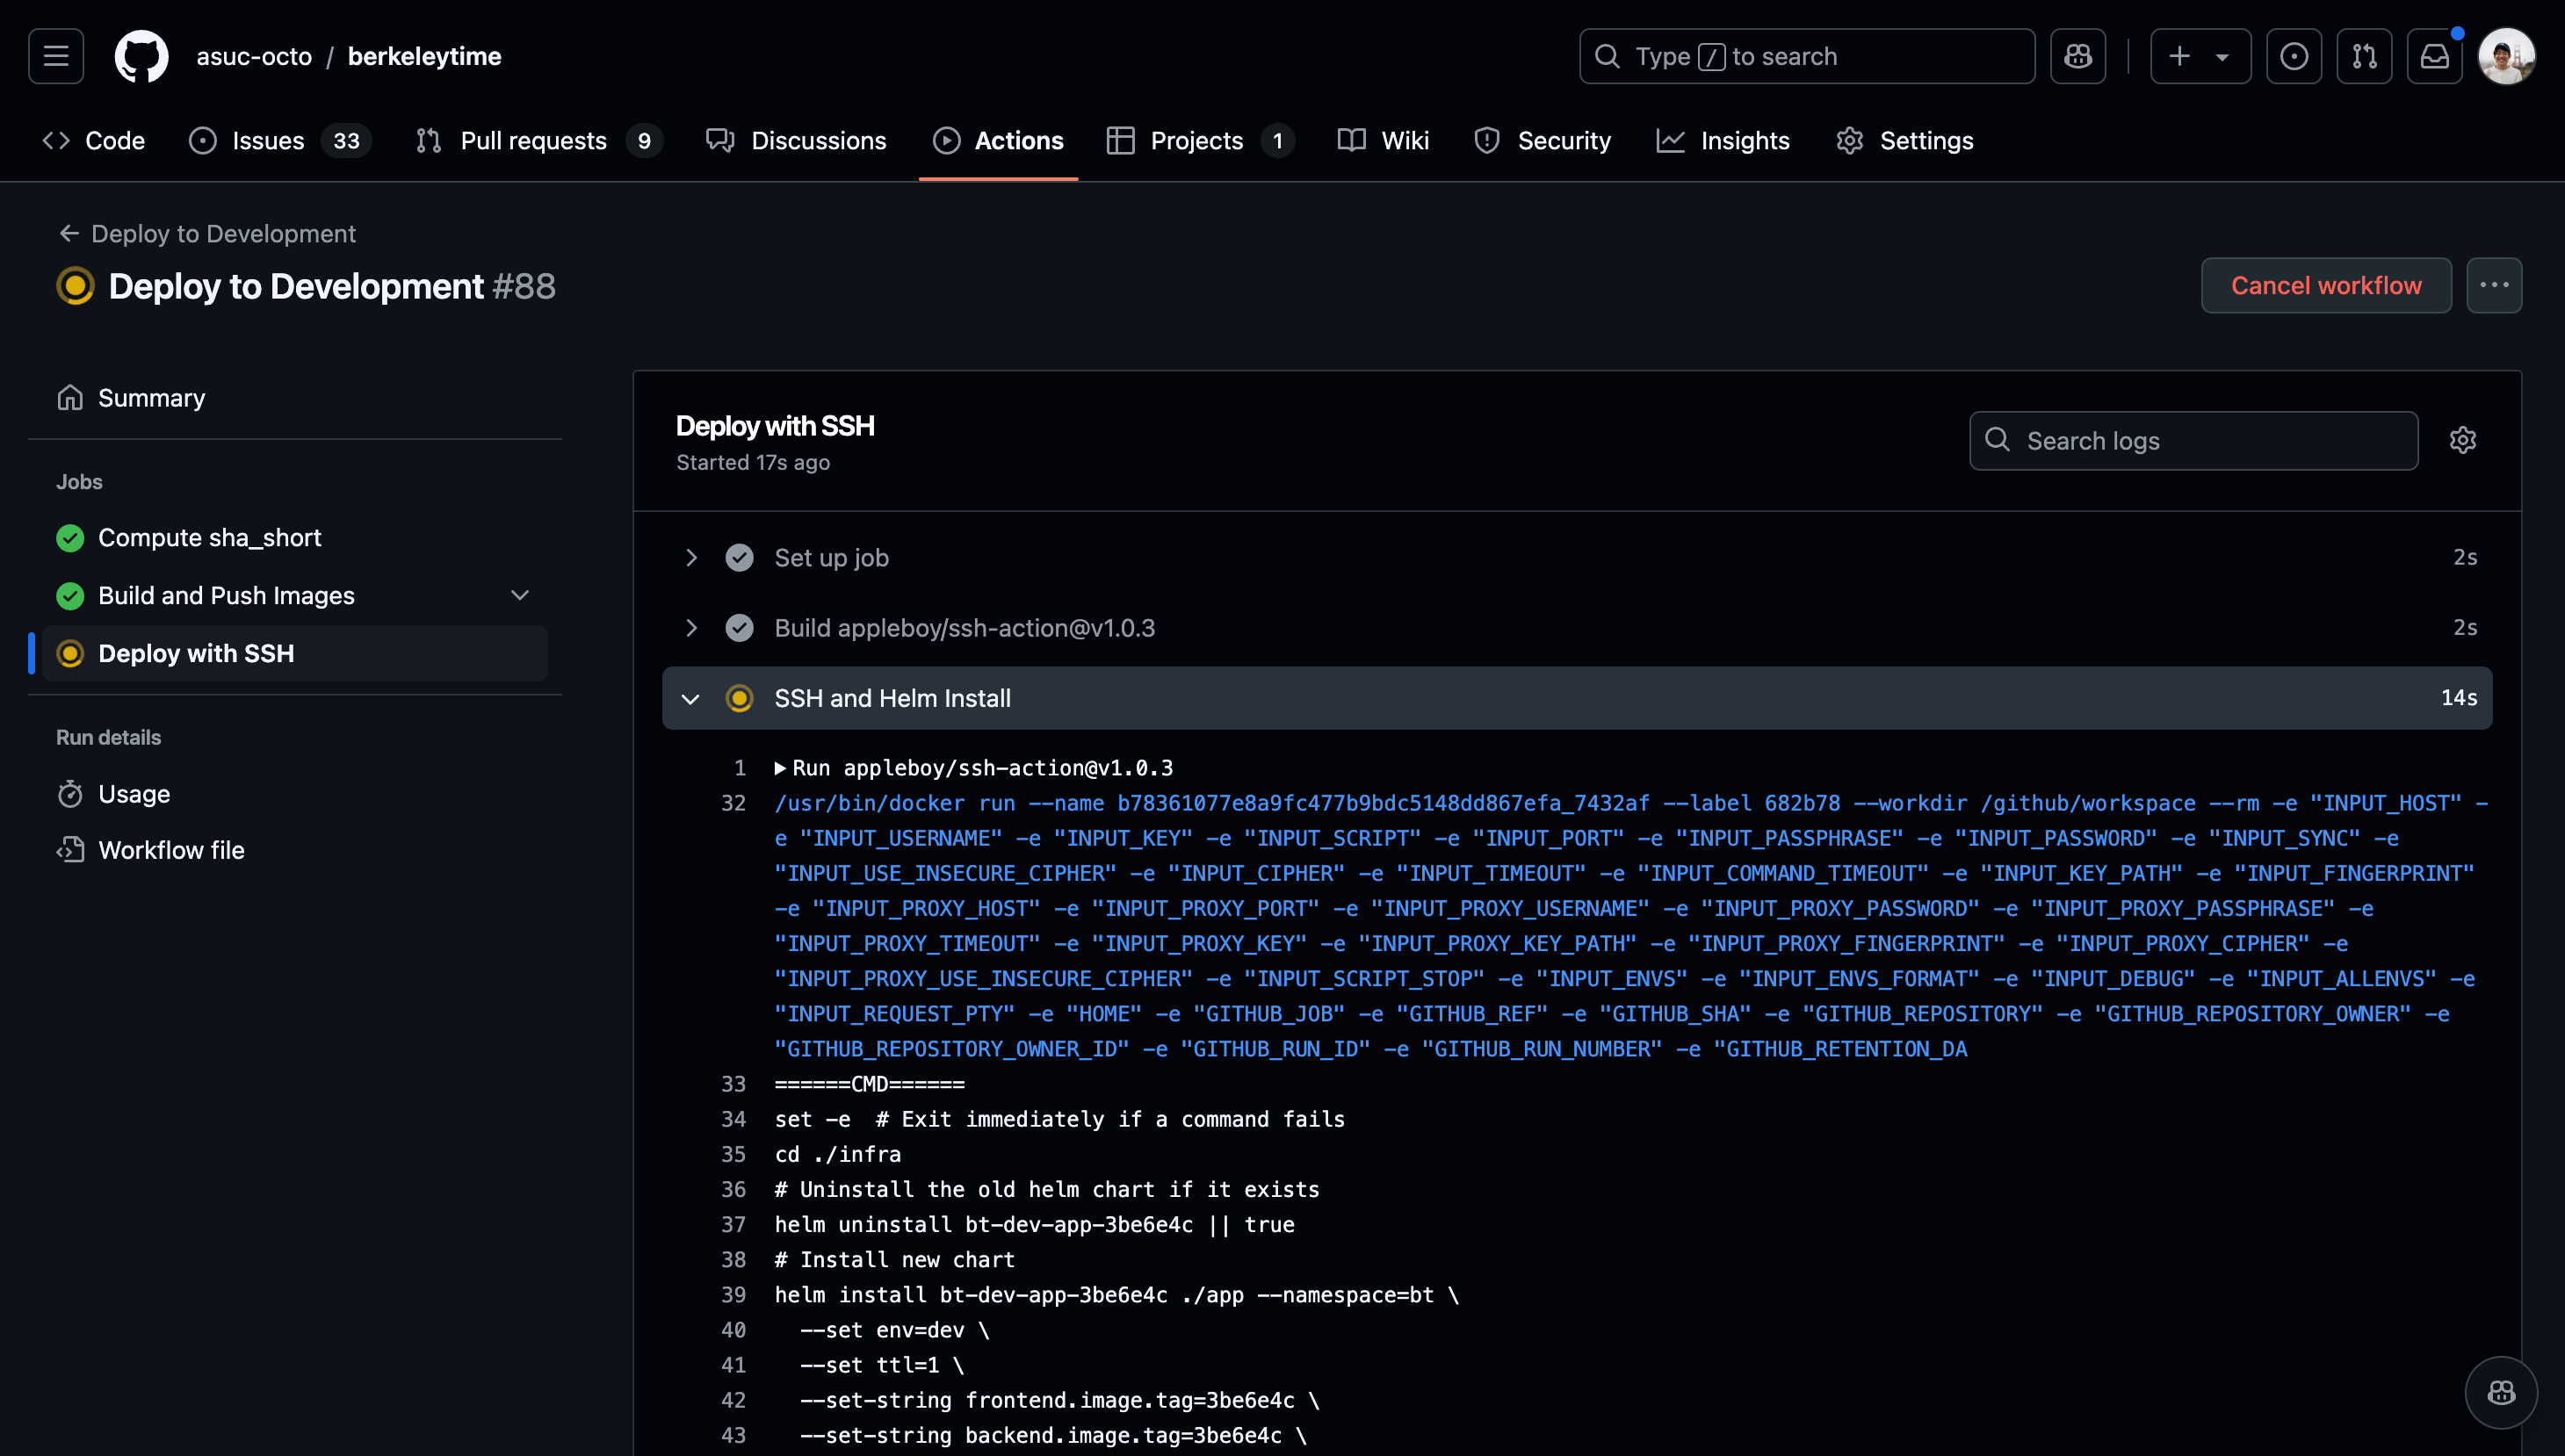
-
Once the action starts running, click into the action and watch the status of each step. If the deployment fails, the action will fail as well.
Images
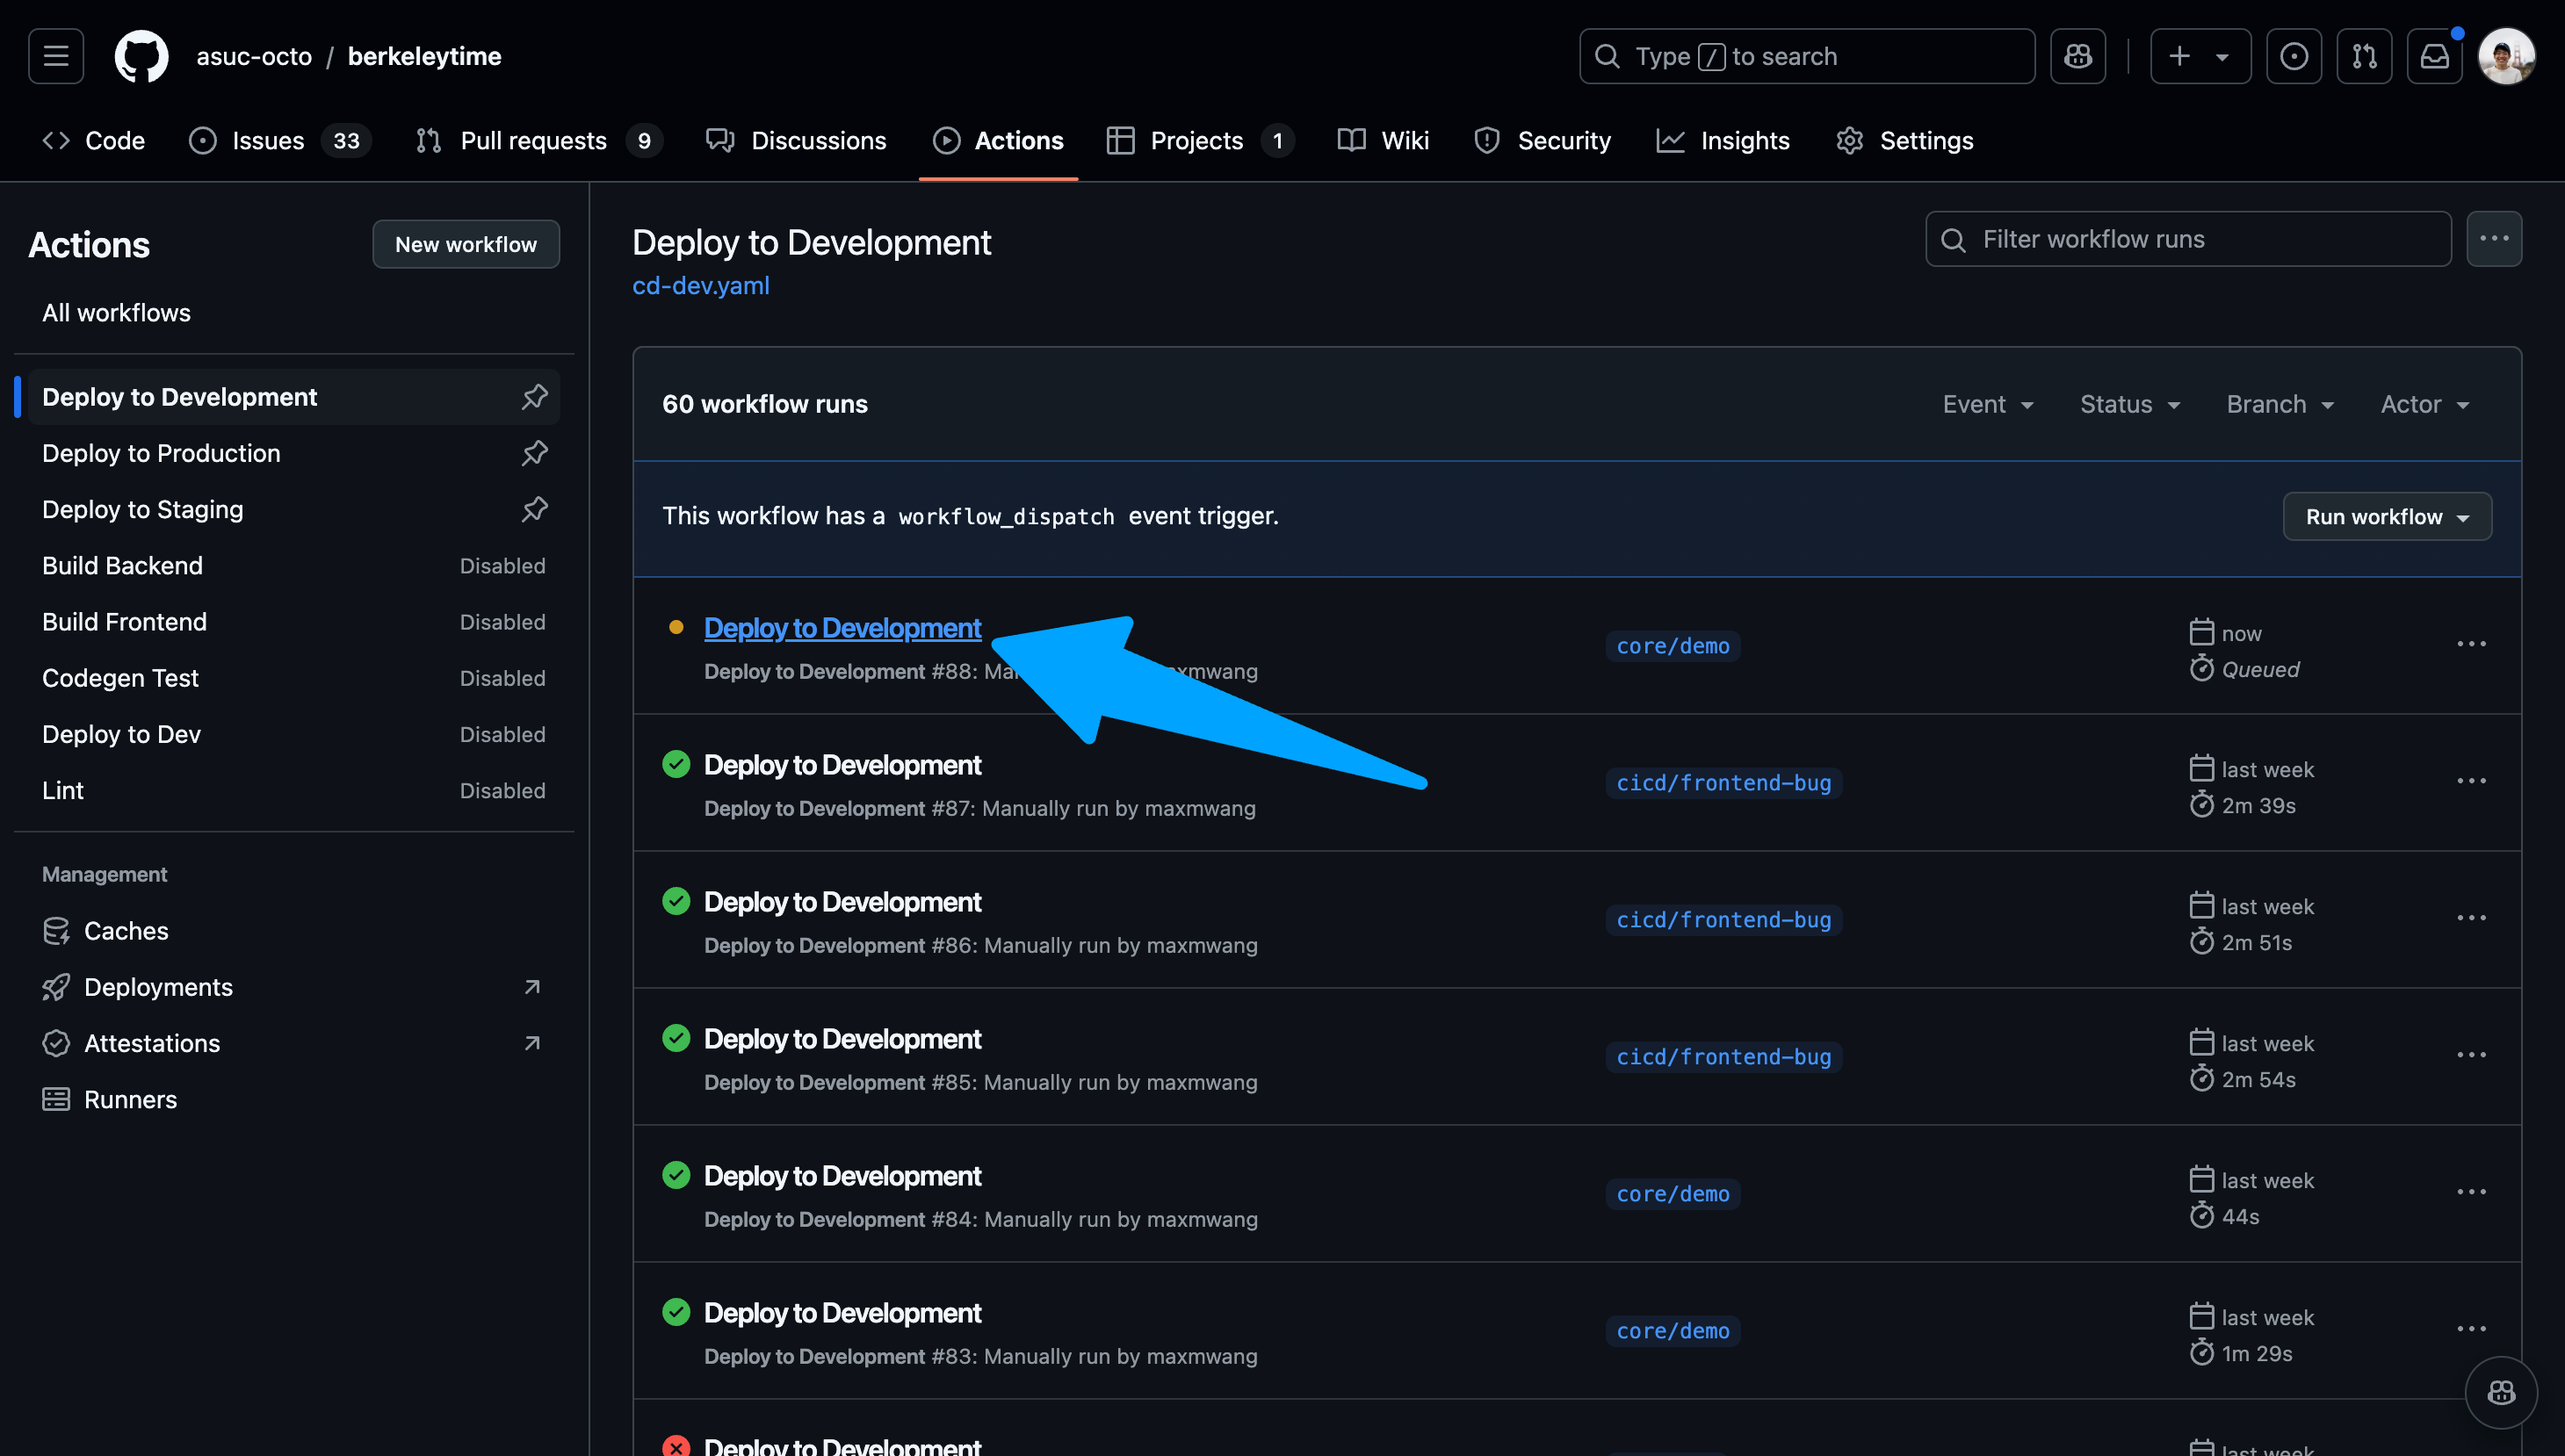 You can view the logs of each step by navigating the left sidebar.
-
After the action succeeds, go to
www.abcdefg.dev.berkeleytime.com, whereabcdefgis the first 7 characters of the latest commit's hash. This is also shown on the summary tab of an action workflow. A hyperlink to the deployment is also available near the bottom of the Summary page of the workflow run.Example Success Deployment Log
======= CLI Version =======
Drone SSH version 1.8.0
===========================
Release "bt-dev-app-69d94b6" does not exist. Installing it now.
Pulled: registry-1.docker.io/octoberkeleytime/bt-app:0.1.0-dev.69d94b6
Digest: sha256:e3d020b8582b8b4c583f026f79e4ab2b374386ce67ea5ee43aa65c6b334f9db0
W1204 22:20:37.827877 2103423 warnings.go:70] unknown field "spec.template.app.kubernetes.io/instance"
W1204 22:20:37.827939 2103423 warnings.go:70] unknown field "spec.template.app.kubernetes.io/managed-by"
W1204 22:20:37.827947 2103423 warnings.go:70] unknown field "spec.template.app.kubernetes.io/name"
W1204 22:20:37.827952 2103423 warnings.go:70] unknown field "spec.template.env"
W1204 22:20:37.827956 2103423 warnings.go:70] unknown field "spec.template.helm.sh/chart"
NAME: bt-dev-app-69d94b6
LAST DEPLOYED: Wed Dec  4 22:20:36 2024
NAMESPACE: bt
STATUS: deployed
REVISION: 1
TEST SUITE: None
Waiting for deployment "bt-dev-app-69d94b6-backend" rollout to finish: 0 of 2 updated replicas are available...
Waiting for deployment "bt-dev-app-69d94b6-backend" rollout to finish: 1 of 2 updated replicas are available...
deployment "bt-dev-app-69d94b6-backend" successfully rolled out
deployment "bt-dev-app-69d94b6-frontend" successfully rolled out
===============================================
✅ Successfully executed commands to all hosts.
===============================================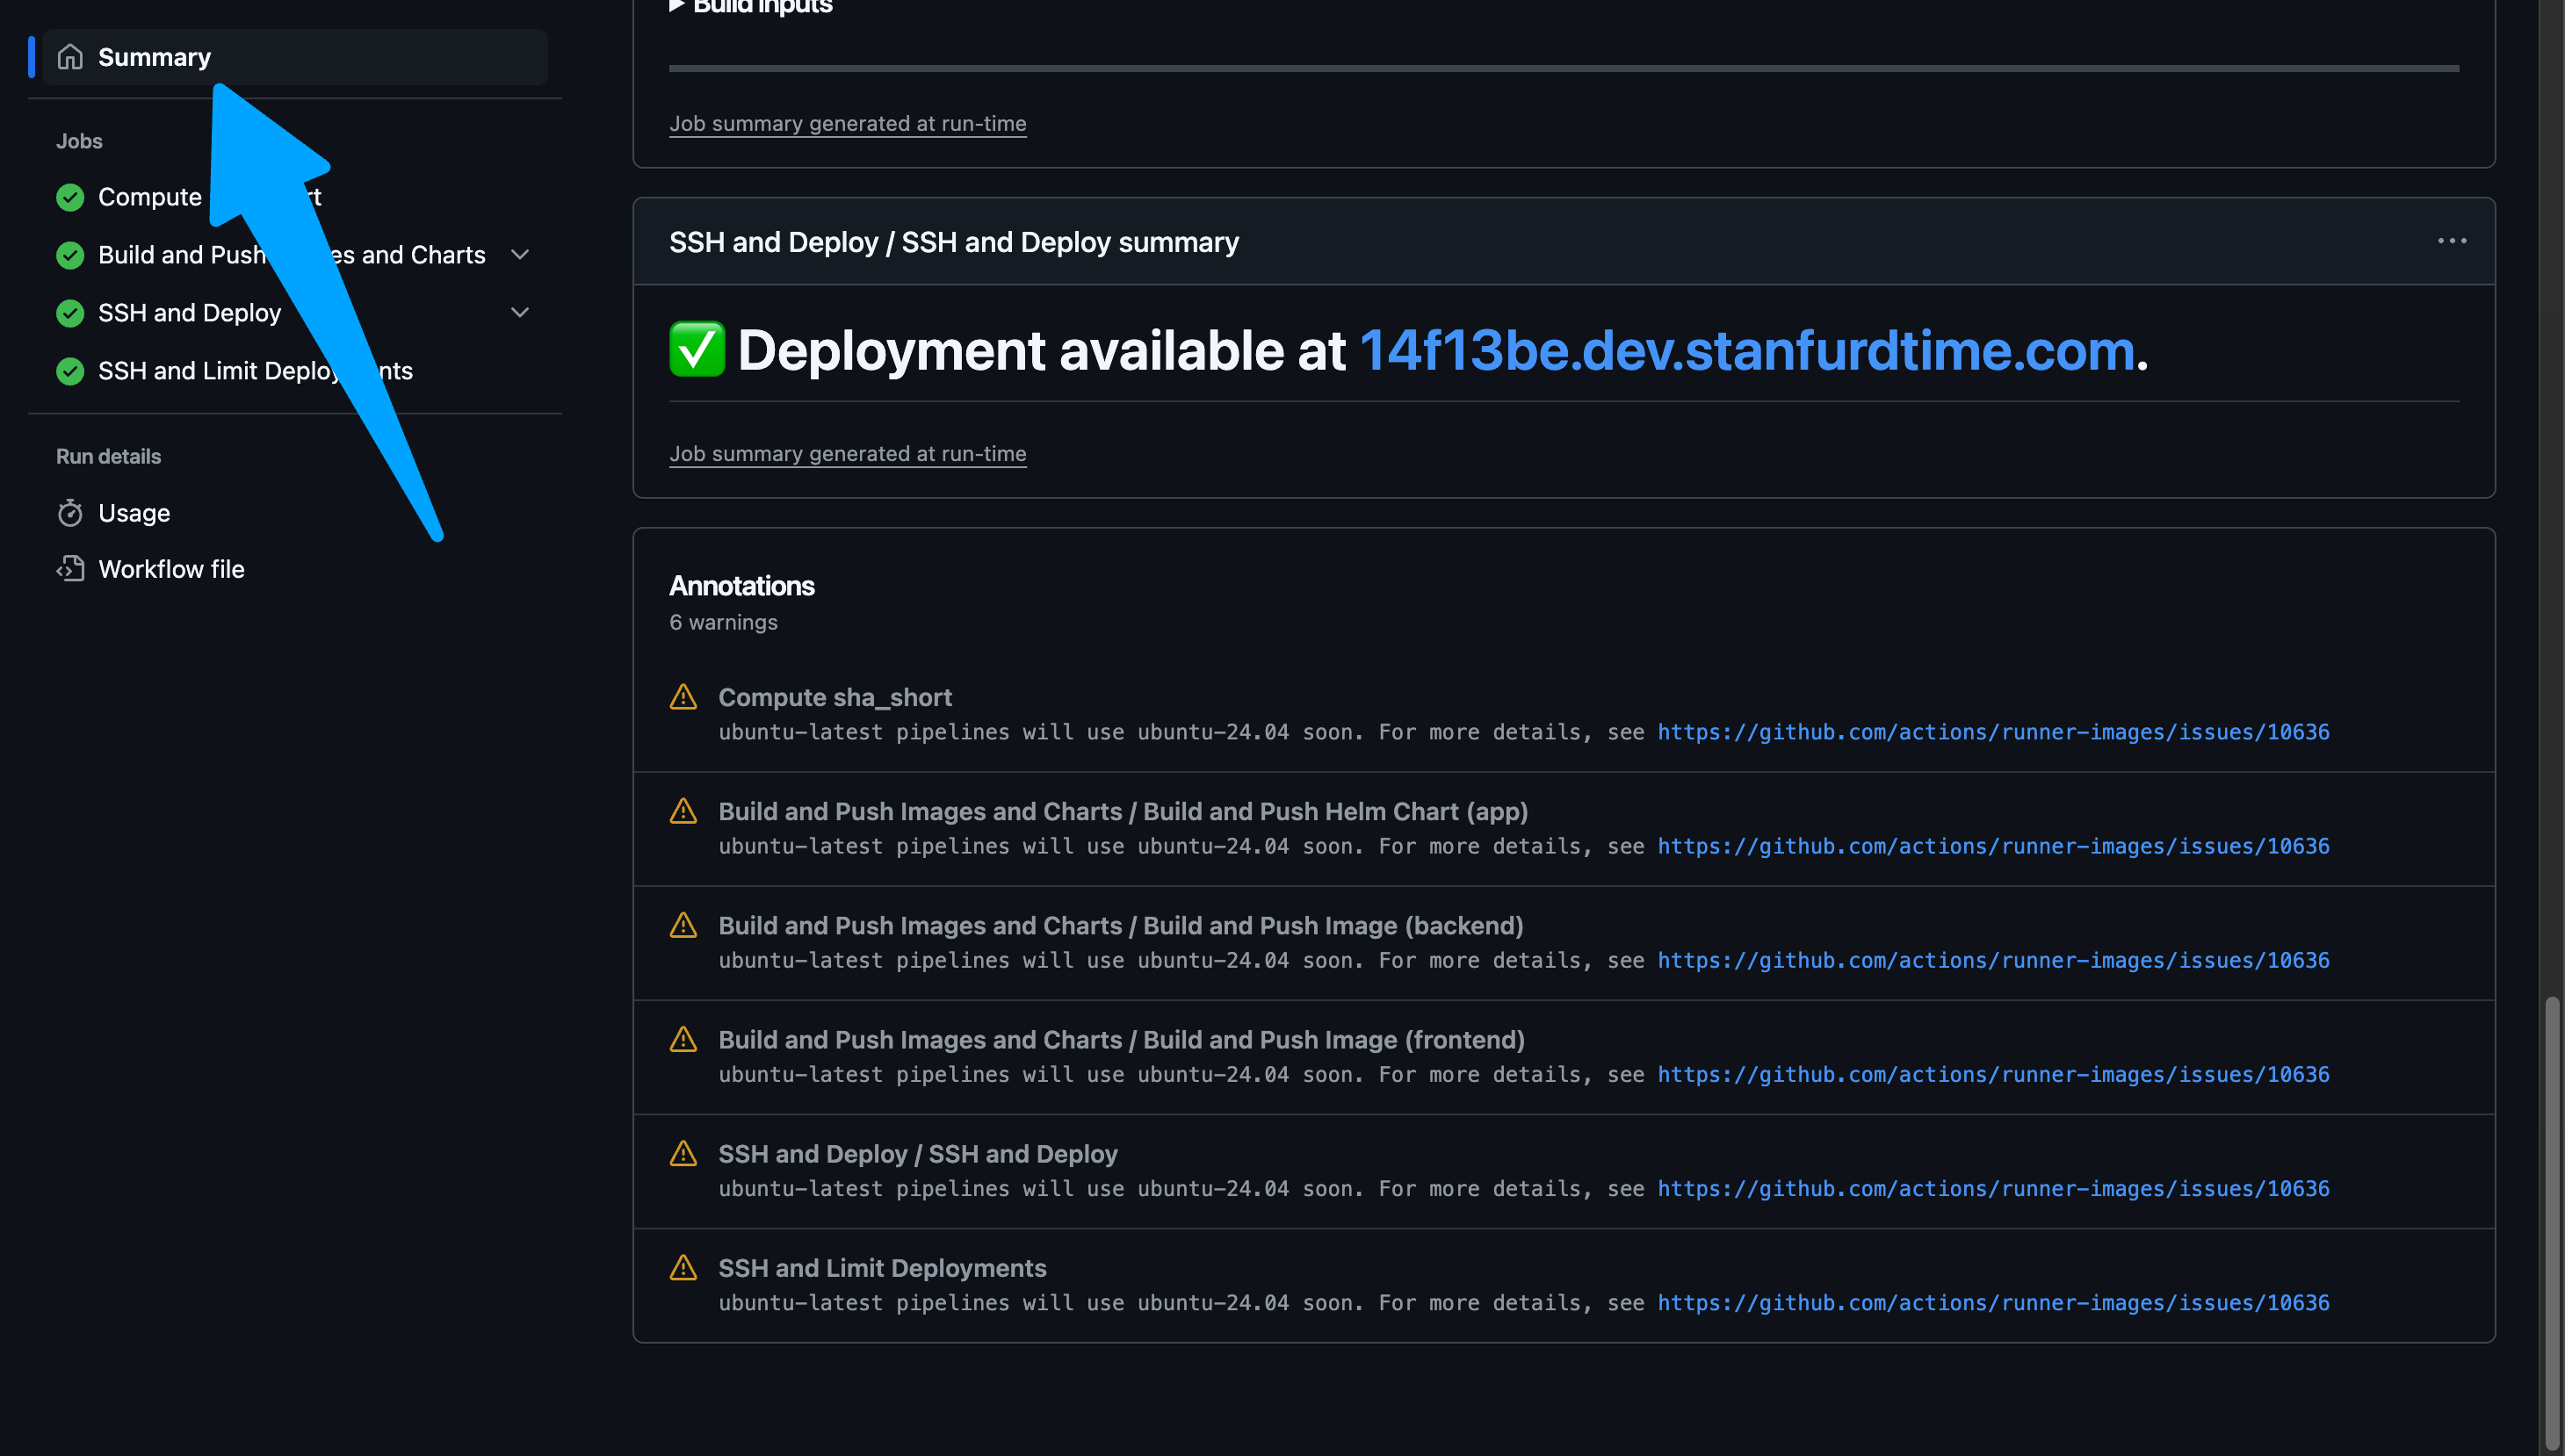
Staging
The staging CI/CD pipeline is automatically run on every push to main. The staging website can be viewed at staging.berkeleytime.com.
Production
The production CI/CD pipeline is manually run with a process similar to the development pipeline. However, the production pipeline can only be run on main.
Backend
What is the backend?
The backend application service is the user-facing API server responsible for serving data to the frontend. Communication between the backend and frontend is done with HTTPS, as do most websites on the modern internet.
In addition to the user-facing API server, the backend application service also has an internal HTTP server used mainly by the datapuller.
To see more on how the backend service interacts with other components in the Berkeleytime system, view the architecture page.
The Berkeleytime Backend Service
The Tech Stack
The backend uses the following technologies:
- Programming Language: TypeScript
- Runtime Environment: NodeJS
- Web Server Framework: ExpressJS
- GraphQL Server1: Apollo Server
As opposed to a simpler REST API, Berkeleytime uses a GraphQL API design. This creates a more flexible backend API and allows the frontend to be more expressive with its requests.
Codebase Organization
The backend codebase has a simple folder layout, as described below.
.
├── src
│   └── bootstrap                       # Bootstrapping and loading of backend dependencies
│       └── index.ts                    # Bootstrapping/Loading entrypoint.
│   └── modules                         # Business logic of the app divided by domain.
│       └── index.ts                    # Modules entrypoint.
│   ├── utils                           # Collection of utility function
│   ├── config.ts                       # Handles environment variable loading
│   └── main.ts                         # Backend entrypoint
└── codegen.ts                          # GraphQL code generation configuration file
Here is a list of services bootstrapped by the files in src/bootstrap:
- Web Server Framework: ExpressJS
- GraphQL Server: Apollo Server
- Authentication: Passport
- MongoDB ORM: Mongoose
- Cache Connection: Redis
The bulk of the application logic is split into separate modules within the src/modules directory. A module contains a collection of files necessary to serve the GraphQL queries for its domain. The file structure of the modules are all very similar. Below is the user module as an example:
.
├── src
│   └── modules
│       └── user                        # User module (as an example)
│           └── generated-types         # Generated types from codegen
│               └── module-types.ts     # Relevant Typescript types of GraphQL type definitions
│           └── generated-typedefs                # GraphQL type definitions
│               └── [schema].ts         # A type definition for a schema
│           ├── controller.ts           # Collection of DB-querying functions
│           ├── formatter.ts            # (Optional) Formats DB models to GraphQL type
│           ├── index.ts                # Entrypoint to the module
│           └── resolver.ts             # GraphQL resolver
Inside a Module

The above diagram shows a simplified request-to-response pipeline within a module.
-
A GraphQL request is sent to the backend server. A request looks like a JSON skeleton, containing only keys but no values. The request is "routed" to the specific module.2
-
The resolver handles the request by calling the specific controller method necessary.
- For more information on how the resolver should be designed, it is recommended to consult the Apollo Server documentation on resolvers.
-
The controller queries the Mongo database, using user input to filter documents.
- We use Mongoose as an abstraction layer between our application logic and MongoDB queries.3 Both Mongoose docs and MongoDB docs on queries are valuable resources.
-
The formatter translates the DB response from a database type, from
berkeleytime/packages/common/src/models, into a GraphQL type, from[module]/generated_types/module-types.ts.- Note that not all modules have a formatter because the database type and GraphQL type are sometimes identical.
-
Finally, the result is returned as a GraphQL response in the shape of a JSON, matching the query from step 1.4
In runtime, all of the modules and type definitions are merged into one by src/modules/index.ts, so there isn't any explicit "routing" in our application code.
The Mongoose abstraction is very similar to the built-in MongoDB query language.
Fields not requested are automatically removed.
Generated Type System
The backend uses GraphQL Code Generator with the graphql-modules preset to generate TypeScript types from GraphQL schema definitions. This ensures type safety between your GraphQL resolvers and the schema.
The codegen configuration is defined in apps/backend/codegen.ts:
import type { CodegenConfig } from "@graphql-codegen/cli";

const config: CodegenConfig = {
  schema: "./src/modules/**/generated-typedefs/*.ts",
  generates: {
    "./src/modules/": {
      preset: "graphql-modules",
      presetConfig: {
        baseTypesPath: "../generated-types/graphql.ts",
        filename: "generated-types/module-types.ts",
      },
      plugins: ["typescript", "typescript-resolvers"],
    },
  },
};
Each module has its types generated into generated-types/module-types.ts. These types are used in resolvers to ensure the resolver return types match the GraphQL schema.
To regenerate types after modifying GraphQL type definitions:
# From the backend app directory
npm run generate
tip
When adding a new field to a GraphQL type definition, always regenerate types before implementing the resolver to get proper TypeScript autocomplete and type checking.
Database Models
In addition to the API server, the backend service is responsible for managing MongoDB usage—specifically, how our data is organized and defined through collections, models, and indexes.
.
├── apps
│   └── backend                         # Backend codebase
├── packages                            # Shared packages across apps
│   └── common
│       └── src
│           └── models                  # All database models
│               └── [model].ts          # Example model file
A model file will contain TypeScript types mirroring the database model, a Mongoose model definition, and database index declarations.
// packages/common/src/models/term.ts

// defines TypeScript type for nested object
export interface ISessionItem { /* ... */ }

// defines TypeScript type for term object
export interface ITermItem { /* ... */ }

// defines Mongoose schema using TypeScript type
const termSchema = new Schema<ITermItem>({ /* ... */ });

// defines database indexes
termSchema.index( /* ... */ );

// creates Mongo model instance
export const TermModel: Model<ITermItem> = model<ITermItem>(
  "Term",
  termSchema
);
Testing the API
To test the GraphQL API, it is recommended to first seed the local database in order to have data.
API testing is mainly done through the Apollo GraphQL Sandbox available at http://localhost:3000/api/graphql when the backend container is running. While the UI is helpful for creating queries for you, it is highly recommended to review the GraphQL docs, specifically these pages:
Internal HTTP Service
The backend also serves an HTTP server5 mainly used by the datapuller, which communicates with the backend service to rehydrate the cache via an HTTP request.
In modern microservice systems, non-publicly-exposed services typically use a more efficient protocol, such as gRPC. For simplicity, we just use an HTTP server instead.
Data
Why is Data Important at Berkeleytime?
At its core, Berkeleytime serves as a data aggregation platform. We work directly with the Office of the Registrar and the Engineering and Integration Services department (EIS) to pull data from multiple sources and provide students with the most accurate experience possible. Because data involving students can contain personally-identifiable information (PII), we must ensure we follow any and all data storage and use guidelines imposed by the university.
Understanding the data sources Berkeleytime has access to is imperative for building streamlined services.
Backups and Access
Production backups may contain sensitive data:
- Public backups are redacted and are not a comprehensive dataset.
- Full backups require Cloudflare Access.
For details, see Runbooks.
API Central
The EIS maintains many RESTful APIs that consolidate data from various other sources, and provides documentation in the form of Swagger OpenAPI v3 specifications for each API. API Central serves as a portal for requesting access to individual APIs, interactive documentation, and managing API usage. Berkeleytime only has access to and utilizes the APIs necessary for servicing students.
Accessing APIs
HTTP requests to APIs must be authenticated with a client identifier and secret key pair and are rate limited to minimize unauthorized access and preserve system health.
warning
Client identifiers and secret keys should be treated as sensitive information and should never be shared with third-parties.
TypeScript API clients and types are automatically generated from the specifications using swagger-typescript-api and are provided as a local package for Berkeleytime apps to access.
import { Class, ClassesAPI } from "@repo/sis-api/classes";

const classesAPI = new ClassesAPI();

classesAPI.v1.getClassesUsingGet(...);
Class API
The Class API provides data about classes, sections, and enrollment.
- Classes are offerings of a course in a specific term. There can be many classes for a given course, and even multiple classes for a given course in the same semester. Not all classes for a course need to include the same content either. An example of a class would be COMPSCI 61A Lecture 001 offered in Spring 2024. Classes themselves do not have facilitators, locations, or times associated with them. Instead, they are most always associated with a primary section.
- Sections are associated with classes and are combinations of meetings, locations, and facilitators. There are many types of sections, such as lectures, labs, discussions, and seminars. Each class most always has a primary section and can have any number of secondary sections.
Students don't necessarily enroll only in classes, but also a combination of sections.
Course API
The Course API provides data about courses.
- Courses are subject offerings that satisfy specific requirements or include certain curriculum. An example of a course would be COMPSCI 61A. However, multiple COMPSCI 61A courses might exist historically changing requirements and curriculum require new courses to be created and old courses to be deprecated. Only one course may be active for any given subject and number at a time.
Term API v2
The Term API v2 provides data about terms and sessions.
- Terms are time periods during which classes are offered. Terms at Berkeley typically fall under the Spring and Fall semesters, but Berkeley also offers a Summer term and previously offered a Winter term (in the 1900s). Terms are most always associated with at least one session.
- Sessions are more granular time periods within a semester during which groups of classes are offered. The Spring and Fall semesters at Berkeley consist only of a single session that spans the entire semester, but the Summer term consists of multiple sessions of varying lengths depending on the year.
Datapuller
What is the datapuller?
The datapuller is a modular collection of data-pulling scripts responsible for populating Berkeleytime's databases with course, class, section, grades, and enrollment data from the official university-provided APIs. This collection of pullers are unified through a singular entrypoint, making it incredibly easy for new pullers to be developed. The original proposal can be found here1.
Motivation
Before the datapuller, all data updates were done through a single script run everyday. The lack of modularity made it difficult to increase or decrease the frequency of specific data types. For example, enrollment data changes rapidly during enrollment season—it would be beneficial to be able to update our data more frequently than just once a day. However, course data seldom changes—it would be efficient to update our data less frequently.
Thus, datapuller was born, modularizing each puller into a separate script and giving us more control and increasing the fault-tolerance of each script.
Modifications to the initial proposal are not included in the document. However, the motivation remains relatively consistent.
Local & Remote Development
Local Development
The datapuller inserts data into the Mongo database. Thus, to test locally, a Mongo instance must first be running locally and be accessible to the datapuller container. To run a specific puller, the datapuller must first be built, then the specific puller must be passed as a command1. After modifying any code, the container must be re-built for changes to be reflected.
# ./berkeleytime

# Start up docker-compose.yml
docker compose up -d

# Build the datapuller-dev image
docker build --target datapuller-dev --tag "datapuller-dev" \
    --file="./apps/datapuller/Dockerfile" .

# Run the desired puller. `courses` is used as an example here.
docker run --volume ./.env:/datapuller/apps/datapuller/.env \
    --network berkeleytime_bt "datapuller-dev" "--puller=courses"
The valid pullers are:
coursessections-activesections-last-five-yearsclasses-activeclasses-last-five-yearsgrades-recentgrades-last-five-yearsenrollmentsenrollment-calendarterms-allterms-nearbydecals
tip
If you do not need any other services (backend, frontend), then you can run a Mongo instance independently from the docker-compose.yml configuration. However, the below commands do not allow data persistence.
# Run a Mongo instance. The name flag changes the MONGO_URI.
# Here, it would be mongodb://mongodb:27017/bt?replicaSet=rs0.
docker run --name mongodb --network bt --detach "mongo:7.0.5" \
    mongod --replSet rs0 --bind_ip_all

# Initiate the replica set.
docker exec mongodb mongosh --eval \
    "rs.initiate({_id: 'rs0', members: [{_id: 0, host: 'mongodb:27017'}]})"
Here, I reference the Docker world's terminology. In the Docker world, the ENTRYPOINT instruction denotes the the executable that cannot be overriden after the image is built. The CMD instruction denotes an argument that can be overriden after the image is built. In the Kubernetes world, the ENTRYPOINT analogous is the command field, while the CMD equivalent is the args field.
Remote Development
The development CI/CD pipeline marks all datapuller CronJobs as suspended, preventing the datapuller jobs to be scheduled. To test a change, manually run the desired puller.
Frontend
We maintain a static, single-page application (SPA) at berkeleytime.com. Once compiled, the application consists only of HTML, JavaScript, and CSS files served to visitors. No server generates responses at request time. Instead, the SPA utilizes the browser to fetch data from the backend service hosted at berkeleytime.com/api/graphql.
We originally chose this pattern because most developers are familiar with React, Vue, Svelte, or other SPA frameworks and we did not want to opt for a more opinionated meta-framework like Next.js or Remix for now. However, there are always trade-offs.
The frontend consists of the design, components, and logic that make up our SPA.
Recommendations
Stack
Berkeleytime is built entirely with TypeScript and the frontend follows suit with strictly-typed React built with Vite. Because we use Apollo for our GraphQL server, use the React Apollo client for fetching and mutating data on the frontend.
import { useQuery } from "@apollo/client/react";

import { READ_CLASS, ReadClassResponse, Semester } from "@/lib/api";

export const useReadClass = (
  year: number,
  semester: Semester,
  subject: string,
  courseNumber: string,
  number: string,
  options?: Omit<useQuery.Options<ReadClassResponse>, "variables">
) => {
  const query = useQuery<ReadClassResponse>(READ_CLASS, {
    ...options,
    variables: {
      year,
      semester,
      subject,
      courseNumber,
      number,
    },
  });

  return {
    ...query,
    data: query.data?.class,
  };
};
Structure
The frontend consists of not only the SPA, but also various packages used to modularize our codebase and separate concerns. These packages are managed by Turborepo, a build system designed for scaling monorepos, but I won't dive too deep into how Turborepo works right now.
apps/
  ...
  frontend/                     # React SPA served at https://berkeleytime.com
  ...
packages/
  ...
  theme/                        # React design system
  eslint-config/                # Shared utility package for ESLint configuration files
  typescript-config/            # Shared utility package for TypeScript configured files
  ...
You can see how the frontend app depends on these packages within the apps/frontend/package.json.
{
  "name": "frontend",
  // ...
  "dependencies": {
    // ...
    "@repo/theme": "*",
    "react": "^19.0.0"
  },
  "devDependencies": {
    // ...
    "@repo/eslint-config": "*",
    "@repo/typescript-config": "*",
    "@types/react": "^19.0.8",
    "@vitejs/plugin-react": "^4.3.4",
    "eslint": "^9.19.0",
    "typescript": "^5.7.3",
    "vite": "6.0.8"
  }
}
Design system
We maintain a design system built on top of Radix primitives, a library of unstyled, accessible, pre-built React components like dialogs, dropdown menus, and tooltips. By standardizing components, colors, icons, and other patterns, we can reduce the amount of effort required to build new features or maintain consistency across the frontend.
The design system houses standalone components that do not require any external context. They maintain design consistency and should function whether or not they are used in the context of Berkeleytime. More complex components specific to Berkeleytime, such as for classes or courses, live in the frontend app and will be discussed later.
We use Iconoir icons and the Inter typeface family. These design decisions, and reusable design tokens, are all abstracted away within the theme package and the ThemeProvider React component.
# packages/theme/src
...
components/                          # React components for the design system
  ...
  ThemeProvider/                     # Entry point component
  Button/
  Dialog/
  Tooltip/
  ...
contexts/                            # React contexts for the design system
hooks/                               # React hooks for the design system
...
We built our design system with light and dark themes in mind, and the color tokens will respond accordingly. When building interfaces within Berkeleytime, standard color tokens should be used to ensure consistency depending on the selected theme.
// packages/theme/components/ThemeProvider/ThemeProvider.module.scss

@mixin light-theme {
  --foreground-color: var(--light-foreground-color);
  --background-color: var(--light-background-color);
  --backdrop-color: var(--light-backdrop-color);

  // ...
}

@mixin dark-theme {
  --foreground-color: var(--dark-foreground-color);
  --background-color: var(--dark-background-color);
  --backdrop-color: var(--dark-backdrop-color);

  // ...
}

body[data-theme="dark"] {
  @include dark-theme;
}

body[data-theme="light"] {
  @include light-theme;
}

body:not([data-theme]) {
  @include light-theme;

  @media (prefers-color-scheme: dark) {
    @include dark-theme;
  }
}
Generated Type System
Berkeleytime uses GraphQL Code Generator to automatically generate TypeScript types from GraphQL queries. This provides end-to-end type safety from your queries to your components.
Workflow
- Write queries in
src/lib/api/*.tsusing thegqltag - Run codegen with
npm run generate - Use the generated Document in your hooks with
useQuery()
Example
First, define your query in src/lib/api/courses.ts:
import { gql } from "@apollo/client";

export const GET_COURSE = gql`
  query GetCourse($subject: String!, $number: CourseNumber!) {
    course(subject: $subject, number: $number) {
      courseId
      title
      description
    }
  }
`;
After running npm run generate, use the generated GetCourseDocument in your hooks:
import { useQuery } from "@apollo/client/react";
import {
  GetCourseDocument,
  GetCourseQuery,
} from "@/lib/generated/graphql";

// The Document provides full type inference
const query = useQuery(GetCourseDocument, {
  variables: { subject: "COMPSCI", number: "61A" },
});

// query.data is automatically typed as GetCourseQuery
You can also derive reusable types from the generated query types:
import { GetCourseQuery } from "@/lib/generated/graphql";

// Extract the course type from the query response
export type ICourse = NonNullable<GetCourseQuery["course"]>;
Berkeleytime-specific Components
A number of the Radix primitives and other commonly-used components have since also been adapted to specifically fit Berkeleytime's needs by the design team. These components should be used whenever possible. A full list of components can be found in packages/theme/src/components.
Storybook
To view some of these components and common applications, you can go to our Storybook. When running with docker compose, this will automatically be hosted at localhost:6006.
Application
I'm sure you've seen a Vite, React, and TypeScript app in the wild before, and we tend to follow most common practices, which includes using React Router.
#
src/
  app/                    # Views, pages, and scoped components
  components/             # Reusable components built around Berkeleytime
  contexts/               # React contexts
  hooks/                  # React hooks
  lib/                    # Utility functions and general logic
    api/                  # GraphQL types and queries
    ...
  main.tsx
  App.tsx                 # Routing and React entry point
  index.html
  ...
  vite.config.ts
Conventions
We use SCSS modules for scoping styles to components and reducing global CSS clutter. A typical folder (in src/app or src/components) should be structured like so.
# apps/frontend
src/app/[COMPONENT]/
  index.tsx
  [COMPONENT].module.scss
  ...
  [CHILD_COMPONENT]/
    index.tsx
    [CHILD_COMPONENT].module.scss
Child components should be used in your best judgment whenever significant logic must be refactored out of the component for structural or organizational purposes. If child components are reused in multiple pages or components, they should be moved as high up in the file structure as is required or moved to src/components.
Staff Dashboard
The Staff Dashboard is an administrative interface for managing Berkeleytime staff, viewing analytics, and configuring platform settings. It is accessible only to users with staff status.
Stack
- Framework: React with TypeScript
- Build Tool: Vite
- Data Fetching: Apollo Client (GraphQL)
- UI: @repo/theme design system
- Charts: Recharts
Structure
apps/staff-frontend/
├── src/
│   ├── app/                   # Feature pages
│   │   ├── Dashboard/         # Staff management
│   │   ├── Analytics/         # Analytics dashboards
│   │   ├── Banners/           # Banner management
│   │   └── RouteRedirects/    # URL redirect management
│   ├── components/
│   │   ├── Layout/            # Main layout wrapper
│   │   ├── NavigationBar/     # Tab navigation
│   │   └── Chart/             # Chart components
│   ├── hooks/api/             # GraphQL hooks
│   └── lib/api/               # GraphQL queries & mutations
├── package.json
└── vite.config.ts
Features
Staff Management
The main dashboard provides tools for managing Berkeleytime team members:
- Staff Directory: View all staff members with search and filter options
- Add Staff: Promote existing users to staff status
- Edit Staff: Update staff info, photos, and semester roles
- Pod Management: Organize staff into teams/pods by semester
Staff membership also controls access to private Mongo backups at https://backups.berkeleytime.com/private/*. When a user is added as staff, their email is added to the Cloudflare Zero Trust Access group that protects those backups; when they are removed from staff, their email is removed from that group. To backfill existing staff into the Access group, use the GraphQL mutation syncCloudflareStaffAccess (staff-only). See Runbooks — Cloudflare Access staff backup sync.
Each staff member can have multiple semester roles with:
- Role type (Engineering, Design, etc.)
- Leadership flag
- Pod/team assignment
- Profile photos
Analytics
The analytics section provides insights into platform usage:
| Dashboard | Metrics |
|---|---|
| General | Unique visitors, requests, user growth, signup patterns |
| Scheduler | Schedules created, daily trends, classes per schedule |
| Ratings | Rating counts, course distribution, score trends |
| GradTrak | Plans created, major/minor distribution |
| Bookmarks | Collection usage, bookmark trends |
Banners
Create and manage platform-wide announcements:
- Rich text content with HTML support
- Optional link with custom text
- Persistent vs. dismissible banners
- Create/update/delete operations
Route Redirects
Configure URL redirects for the platform:
- Map internal paths to external URLs
- Useful for legacy links or shortlinks
Local Development
The staff dashboard runs on port 3002:
# Start with docker compose
docker compose up staff-frontend

# Or run standalone
cd apps/staff-frontend
npm run dev
Access at http://localhost:3002
Authentication
The dashboard uses OAuth authentication through the backend:
- User visits staff dashboard
- If not authenticated, redirected to
/api/login - After OAuth flow, backend validates staff status
- Non-staff users see a sign-in prompt
note
You must be added as a staff member by an existing staff member to access the dashboard.
Infrastructure
note
Infrastructure concepts tend to be more complex than application concepts. Don't be discouraged if a large amount of content in the infrastructure section is confusing!
What is Infrastructure?

Software infrastructure refers to the services and tools that create an underlying layer of abstractions that the application is developed on. Compared to the application layer, infrastructure is significantly more broad in its responsibilities, although these responsibilities are more common in software development.
important
We aim to use a small set of existing infrastructure solutions with large communities. This philosophy reduces the cognitive load on each developer and simplifies the onboarding process, both of which are valuable for creating long-lasting software in a team where developers are typically cycled out after only ~4 years.
Backups
Mongo backups are served from https://backups.berkeleytime.com. Download steps live in Runbooks.
Secrets
Secret management (including sealed-secrets and the json-to-secret.sh helper script) is documented in Runbooks.
Onboarding
Architecture
Berkeleytime uses a fairly simple microservices architecture—we decouple only a few application components into separate services. Below is a high-level diagram of the current architecture (switch to a light viewing mode to see arrows).

Note that, other than the application services developed by us, all other services are well-known and have large communities. These services have many tutorials, guides, and issues already created online, streamlining the setup and debugging processes.
An HTTP Request's Life
To better understand the roles of each component in the Berkeleytime architecture, we describe the lifecycle of an HTTP request from a user's action.
-
An HTTP request starts from a user's browser. For example, when a user visits
https://berkeleytime.com, aGETrequest is sent tohozer-51.1 -
Once the request reaches
hozer-51, it is first encountered byhozer-51's Kubernetes cluster load balancer, a MetalLB instance, which balances external traffic into the cluster across nodes.2 -
Next, the request reaches the reverse proxy, an nginx instance, which forwards HTTP requests to either a backend or frontend service based on the URL of the request
- Requests with URLs matching
https://berkeleytime.com/api/*are forwarded to the backend service. - All other requests are forwarded to the frontend service.
The nginx instance is also responsible for load balancing between the backend/frontend replicas. Currently, there are two of each in all deployment environments.
- Requests with URLs matching
-
The request is processed by one of the services.
- The backend service may interact with the MongoDB database or the Redis cache while processing the request.3
-
Finally, an HTTP response is sent back through the system to the user's machine.
More specifically, the user's machine first requests a DNS record of berkeleytime.com from a DNS server, which should return hozer-51's IP address. After the user's machine knows the hozer-51 IP address, the GET request is sent.
Currently, we only have one node: hozer-51.
Requests sent from the backend to the database or cache are not necessarily HTTP requests.
SSH Setup
warning
This onboarding step is not necessary for local development. As running commands in hozer-51 can break production, please continue with caution.
The Berkeleytime website is hosted on a machine supplied by the OCF. This machine will be referenced as hozer-51 in these docs. SSH allows us to connect to hozer-51 with a shell terminal, allowing us to infra-related tasks.
This guide assumes basic experience with SSH.
-
Please ensure your public SSH key has an identifying comment attached, such as your Berkeley email:
ssh-ed25519 AAAAC3NzaC1lZDI1NTE5AAq8Lwls394thisIsNotARealKey [email protected]You can directly modify your public key file at
~/.ssh/id_*.pub, or you can use the following command:ssh-keygen -c -C "[email protected]" -f ~/.ssh/id_*Note that
-ftakes in the path to your private key file, but only modifies the public key file. -
Copy your SSH key to the
hozermachine'sauthorized_keysfile:ssh-copy-id [email protected]The SSH password can be found in the pinned messages of the #backend staff channel in discord.
-
(Optional) Add
hozer-51to your~/.ssh/configfile:# Begin Berkeleytime hozer config Host hozer-?? HostName %h.ocf.berkeley.edu User root # End Berkeleytime hozer configNow, you can quickly SSH into the remote machine from your terminal:
ssh hozer-51
# as opposed to [email protected]
Kubernetes & Helm
Kubernetes is a container orchestrator that serves as the foundation of our infrastructure. It provides a simple deployment interface. To get started with Kubernetes, here are a few resources:
- The concepts page is a good place to start.
- The glossary is also a good place to glance over common jargon.
Helm is a package manager for Kubernetes that provides an abstraction over the Kubernetes interface for deploying groups of components called "charts". In addition, it allows us to install pre-made charts, useful for deploying services that we don't develop.
Here is a diagram outlining (in some detail) the structure of the Kubernetes cluster:
Useful Commands
This is an uncomprehensive list of commands that can be executed in hozer-51, useful for debugging.
tip
On hozer-51, k is an alias for kubectl and h is an alias for helm.
important
The default namespace has been set as bt.
Pods
-
k get podsView all running pods.
-
k get pods -l env=[dev|stage|prod]View all running pods in a specified environment.
-
k logs [pod name]View logs of a pod. You can get a pod's name with
k get pods. Include a-fflag to follow logs, which will stream logs into your terminal. -
k describe pod [pod name]View a description of a pod. Useful for when pod is failing to startup, thus not showing any logs.
-
k exec -it [pod name] -- [command]Execute a command inside a pod. The command can be
bash, which will start a shell inside the pod and allow for more commands.
Deployments
-
k get deployView all running deployments.
-
k get deploy -l env=[dev|stage|prod]View all running deployments in a specified environment.
-
k describe deploy [deploy name]View a description of a deploy. Useful for when the deploy's pods are failing to startup, thus not showing any logs.
-
k rollout restart deploy/[deploy name]Manually restart a deployment.
Helm Charts
-
h listList helm chart releases. A release is an installed instance of a chart.
Deployment Environments & CI/CD Workflow
What are Deployment Environments?
Berkeleytime has three deployment environments: production, staging, and development. The production environment refers to the live deployed website seen by users of Berkeleytime and should contain code already tested in the other two environments. The staging and development environments are primarily used by Berkeleytime developers/designers to test new code.
- Production: Finalized changes merged in
mainare manually deployed here at berkeleytime.com - Staging: Changes already merged in
mainare automatically deployed here at staging.berkeleytime.com - Development: Specific git branches can be manually deployed here.
The CI/CD Github Actions
We use GitHub actions to build our CI/CD workflows.1 All three CI/CD workflows2 are fairly similar to each other and can all be broken into two phases: the build and the deploy phase.
-
Build Phase: An application container and Helm chart are built and pushed to a registry. We use Docker Hub. This process is what
.github/workflows/cd-build.yamlis responsible for and is run in the Github Action environment. -
Deploy Phase: After the container and Helm chart are built and pushed to a registry, they are pulled and deployed onto
hozer-51. This process is what.github/workflows/cd-deploy.yamlis responsible for and is run in the Github Action environmentssh'd intohozer-51.

Comparing Deployment Environment Actions
The differences between the three environments are managed by each individual workflow file: cd-dev.yaml, cd-stage.yaml, and cd-prod.yaml.
| Development | Staging | Production | |
|---|---|---|---|
| k8s Pod Prefix | bt-dev-* | bt-stage-* | bt-prod-* |
| Container Tags | [commit hash] | latest | prod |
| Helm Chart Versions3 | 0.1.0-dev-[commit hash] | 0.1.0-stage | 1.0.0 |
| TTL (Time to Live) | [GitHub Action input] | N/A | N/A |
| Deployment Count Limit | 8 | 1 | 1 |
Datapuller suspend | true | false | false |
In the past, we have used a self-hosted GitLab instance. However, the CI/CD pipeline was obscured behind a admin login page. Hopefully, with GitHub actions, the deployment process will be more transparent and accessible to all engineers. Please don't break anything though!
Development, Staging, and Production
Ideally, these would follow semantic versioning, but this is rather difficult to enforce and automate.
DNS & TLS Certificates
Introduction
What is the Domain Name System (DNS)?
The DNS is a system used across to internet to associate domains, such as berkeleytime.com, with IP addresses, such as 123.123.123.123. Internet browsers use the DNS protocol to translate common domains to IP addresses to know where to route packets.
UC Berkeley classes that cover how a DNS work include:
Learn more about DNSs:
What are TLS Certificates?
A TLS Certificate secures connections between internet browsers and web servers by authenticating web servers, exchanging keys to encrypt data packets, and providing integrity guarantees over the connection. Connections to websites secured with TLS certificates typically use HTTPS instead of HTTP.
UC Berkeley classes that cover how TLS Certificates work include:
Learn more about SSL/TLS (SSL is the predecessor to TLS):
Our Cloudflare DNS Setup
For the most relevant setup documentation, refer to Cloudflare's DNS Setup Docs.
We pay for the domains berkeleytime.com and stanfurdtime.com, both registered with Cloudflare Registrar. In addition, our authoritative DNS is also Cloudlfare, and its configuration (what domains map to what IPs) can be changed on the Cloudflare Developer Dashboard.
Our Kubernetes Cluster Setup
There are two relevant Kubernetes components when discussing DNS and Certificates: our reverse proxy ingress-nginx and cert-manager.
Ingress Nginx
Recall from An HTTP Request's Life, ingress-nginx is our reverse proxy responsible for routing between our application services. Its input is effectively a mapping from a path to a service. This is down through the Ingress Resource:
apiVersion: networking.k8s.io/v1
kind: Ingress
metadata:
    # ...
spec:
  ingressClassName: nginx
  tls:
    # ...
  rules:
    - host: berkeleytime.com
      http:
        paths:
          - path: /
            backend:
              service:
                name: bt-frontend-svc
          - path: /api
            backend:
              service:
                name: bt-backend-svc
This example Ingress resource maps packets routed to berkeleytime.com/ to the frontend service and maps packets routed to berkeleytime.com/api to the backend service.
The ingressClassName instructs ingress-nginx to manage this Ingress resource as one of its reverse proxy destinations.
Certificate Manager
cert-manager is a service that can automatically issue and renew certificates. We only use it to renew certificates. We hardcode a certificate with all domains needed instead of automatic issuing.
apiVersion: cert-manager.io/v1
kind: Certificate
metadata:
  name: bt-cert
spec:
  secretName: bt-cert
  dnsNames:
    - berkeleytime.com
    - "*.berkeleytime.com"
    - "*.dev.berkeleytime.com"
    - stanfurdtime.com
    - "*.stanfurdtime.com"
    - "*.dev.stanfurdtime.com"
Here is a snippet of the hardcoded certificate deployed as of August 2025. This is linked in the Ingress resource earlier under spec.tls.
Runbooks
- Manually Run
datapuller(and Other CronJobs) - Fetch Mongo Backups
- Secrets
- Previewing Infra Changes with
/helm-diffBefore Deployment - Uninstall ALL development helm releases
- Force uninstall ALL helm charts in "uninstalling" state
- Kubernetes API Server Certificate Renewal
- Kubernetes Cluster Initialization
Manually Run datapuller (and Other CronJobs)
-
First, list all cronjob instances:
k get cronjob -
Then, create a job from the specific cronjob:
k create job --from cronjob/[cronjob name] [job name]For example:
k create job --from cronjob/bt-prod-datapuller-courses bt-prod-datapuller-courses-manual-01
Fetch Mongo Backups
Backups are served at https://backups.berkeleytime.com:
- Public:
GET /public/* - Private:
GET /private/*
Public backup (no auth)
Public backups are meant for local development and include only a redacted subset of the bt database. The public backup includes these collections:
classescoursestermssectionsgradeDistributionsenrollmentHistoriesenrollmenttimeframes
curl -f -o "prod-backup.gz" "https://backups.berkeleytime.com/public/daily/prod_public_backup-$(TZ=America/Los_Angeles date -v -6H +%Y%m%d).gz"
Private backup (Cloudflare Access)
First, install the Cloudflare command line tool:
brew install cloudflare/cloudflare/cloudflared
cloudflared access login https://backups.berkeleytime.com
You can then fetch the backup
cloudflared access curl \
  "https://backups.berkeleytime.com/private/hourly/prod_backup-$(TZ=America/Los_Angeles date -v -6H +%Y%m%d%H).gz" \
  -o "prod-backup.gz"
Copy Data Into Container
Reproduced from local development:
docker cp ./prod-backup.gz berkeleytime-mongodb-1:/tmp/prod-backup.gz
docker exec berkeleytime-mongodb-1 mongorestore --drop --gzip --archive=/tmp/prod-backup.gz
docker exec berkeleytime-mongodb-1 mongosh bt --eval 'const r = db.users.findOneAndUpdate({ email: "[email protected]" }, { $setOnInsert: { googleId: "dev-fake-public-backup", email: "[email protected]", name: "Dev User", staff: false, lastSeenAt: new Date() } }, { upsert: true, returnDocument: "after" }); print("Dev user id: " + r._id); print("Login URL: http://localhost:3000/api/dev/login?userId=" + r._id + "&redirect_uri=/");'
Secrets
Deploying a new environment variable with sealed-secrets
Useful when adding new environment variables to .env. To ensure our env variables can be deployed to GitHub without their true value being leaked, they should be encrypted before being pushed to GitHub.
-
SSH into
hozer-51. -
Create a new secret manifest with the key-value pairs and save into
my_secret.yaml:k create secret generic my_secret -n bt --dry-run=client --output=yaml \ --from-literal=key1=value1 \ --from-literal=key2=value2 > my_secret.yaml -
Create a sealed secret from the previously created manifest:
kubeseal --controller-name bt-sealed-secrets --controller-namespace bt \
    --secret-file my_secret.yaml --sealed-secret-file my_sealed_secret.yaml
If the name of the secret might change across installations, add
--scope=namespace-wideto thekubesealcommand. For example,bt-dev-secretandbt-prod-secretare different names. Deployment without--scope=namespace-widewill cause ano key could decrypt secreterror. More details on the kubeseal documentation. -
The newly created sealed secret encrypts the key-value pairs, allowing it to be safely pushed to GitHub. You will need to paste the generated values into
infra/apps/templates/backend.yamlor similar. Just edit the relevant variables, and keep the rest of the settings the same (ie. minimize the git diff).
Steps 2 and 3 are derived from the sealed-secrets docs.
Using json-to-secret.sh to generate (Sealed) Secrets
We have a helper script at infra/json-to-secret.sh that turns a JSON object into a Kubernetes Secret manifest, and optionally a SealedSecret. This should be run from within hozer-51.
Usage
The script reads a JSON object from stdin and generates a Secret manifest (and, if requested, a SealedSecret manifest):
./infra/json-to-secret.sh SECRET_NAME [NAMESPACE=bt] [OUTPUT_FILE=SECRET_NAME.yaml] [SEALED_OUTPUT_FILE=my_sealed_secret.yaml]
Example (generate both a Secret and SealedSecret for production backend env vars in the bt namespace):
cat <<'EOF' | ./infra/json-to-secret.sh bt-prod-backend-env bt bt-prod-backend-env.yaml bt-prod-backend-env-sealed.yaml
{
  "MONGO_URI": "mongodb://...",
  "REDIS_URL": "redis://...",
  "JWT_SECRET": "super-secret"
}
EOF
This will:
- Create a
kubectl create secret generic ... --dry-run=client --output=yamlmanifest and write it tobt-prod-backend-env.yaml. - If
SEALED_OUTPUT_FILEis provided, runkubesealwith--scope=namespace-wideand write theSealedSecretmanifest tobt-prod-backend-env-sealed.yaml.
You should then move/rename the generated SealedSecret manifest into the appropriate Helm chart (for example under infra/app/templates/) and commit it to the repo.
Recommended flow for updating secrets/variables
When you need to add, change, or remove environment variables in an existing secret:
-
Identify the secret and namespace
- Decide on
SECRET_NAMEandNAMESPACE(typicallybt, or environment-specific likebt-dev).
- Decide on
-
Prepare the JSON definition locally
- Create or update a local JSON file (not committed) that represents the full set of key-value pairs you want in the secret, e.g.
bt-prod-backend-env.json.
- Create or update a local JSON file (not committed) that represents the full set of key-value pairs you want in the secret, e.g.
-
Regenerate the manifests with
json-to-secret.sh- Pipe the updated JSON into the script using the same
SECRET_NAMEand namespace as before:
cat bt-prod-backend-env.json | ./infra/json-to-secret.sh bt-prod-backend-env bt bt-prod-backend-env.yaml bt-prod-backend-env-sealed.yaml - Pipe the updated JSON into the script using the same
-
Follow step 4 from above.
Previewing Infra Changes with /helm-diff Before Deployment
The /helm-diff command can be used in pull request comments to preview Helm changes before they are deployed. This is particularly useful when:
- Making changes to Helm chart values in
infra/apporinfra/base - Upgrading Helm chart versions or dependencies
- Modifying Kubernetes resource configurations
To use it:
- Comment
/helm-diffon any pull request - The workflow will generate a diff showing:
- Changes to both app and base charts
- Resource modifications (deployments, services, etc.)
- Configuration updates
The diff output is formatted as collapsible sections for each resource, with a raw diff available at the bottom for debugging.
Uninstall ALL development helm releases
h list --short | grep "^bt-dev-app" | xargs -L1 h uninstall
Development deployments are limited by CI/CD. However, if for some reason the limit is bypassed, this is a quick command to uninstall all helm releases starting with bt-dev-app.
Force uninstall ALL helm charts in "uninstalling" state
helm list --all-namespaces --all | grep 'uninstalling' | awk '{print $1}' | xargs -I {} helm delete --no-hooks {}
Sometimes, releases will be stuck in an uninstalling state. This command quickly force uninstalls all such stuck helm releases.
Kubernetes API Server Certificate Renewal
Kubernetes API server's certificates have a default expiration of 1 year. If they are expired and you try to use kubectl, this is what you may see:
root@hozer-51:~# k get pods
Unable to connect to the server: tls: failed to verify certificate: x509: certificate has expired or is not yet valid: current time 2026-01-16T00:12:21-08:00 is after 2026-01-16T04:29:31Z
You can check when these certificates expire with this command:
kubeadm certs check-expiration
To renew them, run the following commands on the control plane node:
sudo kubeadm certs renew all

# Restart the Kubernetes control plane pods to pick up the new certificates
sudo mv /etc/kubernetes/manifests/*.yaml /tmp/
# Wait 20-30 seconds.
sudo mv /tmp/*.yaml /etc/kubernetes/manifests/
Test that this worked by running k get pods again. If not, debug using kubeadm certs check-expiration.
Kubernetes Cluster Initialization
On (extremely) rare occasions, the cluster will fail. To recreate the cluster, follow the instructions below (note that these may be incomplete, as the necessary repair varies):
-
Install necessary dependencies. Note that you may not need to install all dependencies. Our choice of Container Runtime Interface (CRI) is
containerdwithrunc. You will probably not need to configure the cgroup driver (our choice issystemd), but if so, make sure to set it in both thekubeletandcontainerdconfigs. -
Install Cilium, our choice of Container Network Interface (CNI). Note that you may not need to install the
ciliumCLI tool. -
Follow the commands in
infra/init.shone-by-one, ensuring each deployment succeeds, up until thebt-baseinstallation. -
Because the
sealed-secretsinstance has been redeployed, everySealedSecretmanifest must be recreated usingkubesealand the newsealed-secretsinstance. Look at the sealed secret deployment runbook. -
Now, each remaining service can be deployed. Note that MongoDB and Redis must be deployed before the backend service, otherwise the backend service will crash. Feel free to use the CI/CD pipeline to deploy the application services.
API Sandbox
The API Sandbox is a local development tool for testing and exploring UC Berkeley's Student Information System (SIS) APIs. It provides an interactive UI to make API requests and inspect responses without writing any code.
Quick Start
Running Locally
# From the repository root
docker compose -f docker-compose.api-sandbox.yml up --build
The sandbox will be available at http://localhost:3009, assuming your DEV_BASE_PORT environment variable is 30.
## Features

- **Multiple API Support**: Test Classes, Courses, and Terms APIs
- **All Endpoints**: Access all available SIS API endpoints
- **Dynamic Parameters**: Input fields for all query parameters
- **Pagination**: Navigate through paginated results with Previous/Next buttons
- **JSON Response Viewer**: Formatted, syntax-highlighted response display
- **Response Metrics**: View response time and item counts

## API Credentials

The sandbox requires SIS API credentials (`app_id` and `app_key`) to make requests.

### Automatic Loading from .env

When running via Docker, credentials are automatically loaded from your `.env` file:

```bash
# .env
SIS_CLASS_APP_ID=your_class_api_id
SIS_CLASS_APP_KEY=your_class_api_key
SIS_COURSE_APP_ID=your_course_api_id
SIS_COURSE_APP_KEY=your_course_api_key
SIS_TERM_APP_ID=your_term_api_id
SIS_TERM_APP_KEY=your_term_api_key
The sandbox uses the appropriate credentials based on the selected API type:
- Classes API uses
SIS_CLASS_APP_ID/SIS_CLASS_APP_KEY - Courses API uses
SIS_COURSE_APP_ID/SIS_COURSE_APP_KEY - Terms API uses
SIS_TERM_APP_ID/SIS_TERM_APP_KEY
Manual Entry
You can also enter credentials manually in the UI. Any manual changes will override the .env values until you click "Reset to .env".
note
Credentials are injected at build time and only work for local development. Never deploy this app publicly as it would expose your API keys.
Available APIs
Classes API (/v1/classes)
| Endpoint | Description |
|---|---|
getClasses | Get class data (requires term-id or cs-course-id) |
getClassSections | Get class section data |
getClassDescriptors | Get allowable code/descriptor pairs |
getClassSectionDescriptors | Get class section descriptors |
Courses API (/v5/courses)
| Endpoint | Description |
|---|---|
getCourses | Get course catalog data |
getCourseById | Get course by ID or display name |
getCoursesV4 | Get courses using v4 API (more parameters) |
Terms API (/v2/terms)
| Endpoint | Description |
|---|---|
getTerms | Get terms by query parameters |
getTermById | Get term by ID |
Pagination
Many endpoints support pagination with these parameters:
- page-number: The page to retrieve (default: 1)
- page-size: Results per page (default: 50, max: 100)
Use the Previous/Next buttons in the response header to navigate pages. The sandbox automatically tracks the current page number.
Example Queries
Get all CS classes for a term
- Select Classes API > getClasses
- Set Term ID:
2248(Fall 2024) - Set Subject Area Code:
COMPSCI - Click Send Request
Search for a specific course
- Select Courses API > getCourseById
- Set Course ID:
COMPSCI 61A - Click Send Request
Get current term information
- Select Terms API > getTerms
- Set Temporal Position:
Current - Click Send Request
Troubleshooting
Credentials not loading
Make sure your .env file has the correct variable names and rebuild the Docker container:
docker compose -f docker-compose.api-sandbox.yml up --build
API returns 401 Unauthorized
Your credentials may be invalid or expired. Verify them in API Central.
CORS errors
The SIS API should allow requests from localhost. If you encounter CORS issues, try running via Docker as the container handles this properly.
Related Documentation
- @repo/sis-api - Generated TypeScript clients
- Data Documentation - Data sources overview
- Datapuller - Production data fetching
Packages
Berkeleytime uses a monorepo architecture managed by Turborepo. The packages/ directory contains shared code and configurations used across multiple applications.
Overview
| Package | Description |
|---|---|
| @repo/BtLL | Berkeleytime Logical Language: interpreted DSL for academic requirements (GradTrak) |
| @repo/common | Shared database models, TypeScript types, and utilities |
| @repo/theme | React design system with Radix UI components |
| @repo/shared | Shared utilities, metrics, and rating configurations |
| @repo/gql-typedefs | GraphQL type definitions shared across apps |
| @repo/sis-api | Auto-generated TypeScript client for UC Berkeley SIS APIs |
| @repo/eslint-config | Shared ESLint configuration |
| @repo/typescript-config | Shared TypeScript configuration presets |
Package Dependencies
The following diagram shows how packages relate to each other and to the apps:
┌─────────────────────────────────────────────────────────────────┐
│                           Apps                                   │
├─────────────┬─────────────┬─────────────┬─────────────────────────┤
│  frontend   │   backend   │  datapuller │  staff-frontend, etc.  │
└──────┬──────┴──────┬──────┴──────┬──────┴──────────┬──────────────┘
       │             │             │                 │
       ▼             ▼             ▼                 ▼
┌─────────────────────────────────────────────────────────────────┐
│                         Packages                                 │
├─────────────┬─────────────┬─────────────┬─────────────────────────┤
│   @repo/    │   @repo/    │   @repo/    │       @repo/           │
│   theme     │   common    │   sis-api   │    gql-typedefs        │
├─────────────┼─────────────┼─────────────┼─────────────────────────┤
│   @repo/    │   @repo/    │             │                        │
│   shared    │   eslint-   │             │                        │
│             │   config    │             │                        │
└─────────────┴─────────────┴─────────────┴─────────────────────────┘
                    │
                    ▼
┌─────────────────────────────────────────────────────────────────┐
│               @repo/typescript-config                            │
│         (Base configuration for all packages)                    │
└─────────────────────────────────────────────────────────────────┘
Using Packages
Packages are referenced in package.json using the workspace protocol:
{
  "dependencies": {
    "@repo/common": "*",
    "@repo/theme": "*"
  },
  "devDependencies": {
    "@repo/eslint-config": "*",
    "@repo/typescript-config": "*"
  }
}
Turborepo handles building packages in the correct order based on their dependencies.
Berkeleytime Logical Language (BtLL)
- What is BtLL?
- Overview
- Basic Syntax
- Built-in Functions
- Requirement Types
- Example Program
- Next Steps
- Getting Started
What is BtLL?
Berkeleytime Logical Language (BtLL) is a domain-specific programming language designed to represent and evaluate complex academic requirements. It provides a type-safe, declarative way to express requirements such as course prerequisites, unit requirements, breadth requirements, and composite requirements (AND/OR logic) that are common in academic planning systems.
BtLL enables Berkeleytime to handle the intricate and often nested requirement structures found in university degree programs, allowing for flexible evaluation of whether students have met various academic criteria. The language is built on TypeScript, ensuring strong compatibility with TypeScript types and objects.
Overview
BtLL is a statically-typed, interpreted language that emphasizes clarity and type safety. Programs are executed by defining functions and calling them, with a special main function serving as the entry point.
BtLL is built upon Typescript, ensuring strong compatability with Typescript types and objects.
Basic Syntax
Type System
BtLL supports several built-in types:
- Primitive Types:
boolean,number,string - Collection Types:
List<T>(e.g.,List<number>,List<string>) - Function Types:
Function<ReturnType>(ArgType1, ArgType2, ...) - Object Types:
Plan,Column,Course,Requirement,Label
Variable Declarations
Variables are declared with their type, name, and value:
type variable_name expression
Examples:
boolean is_valid true
number count 42
string greeting "Hello, World!"
List<number> numbers [1, 2, 3, 4, 5]
Function Definitions
Functions are defined with their return type, parameter types, name, and body:
Function<ReturnType>(ParamType1, ParamType2, ...) function_name (param1, param2, ...) {
    // function body
    type return expression
}
Example:
Function<number>(number) times_three (a) {
    number return add([a, a, a])
}
Function Calls
Functions are called using the syntax:
function_name(arg1, arg2, ...)
For functions with generic type parameters:
function_name<Type>(arg1, arg2, ...)
Lists
Lists are created using square brackets:
List<number> my_list [1, 2, 3]
List<string> words ["hello", "world"]
Lists can contain variables and expressions:
List<boolean> results [x, y, or([x, y])]
Comments
Single-line comments start with //:
// This is a comment
boolean x true  // Inline comment
Return Statements
Functions return values using the return keyword:
type return expression
Example:
boolean return and([result_1, result_2])
Program Structure
Every BtLL program must have a main function that serves as the entry point:
Function<ReturnType>() main () {
    // program code
    type return expression
}
Built-in Functions
BtLL provides a rich set of built-in functions organized by category:
- Logic Functions:
and,or,not,equal, etc. - List Functions:
filter,find,reduce,map,contains,get_element,length, etc. - Number Functions:
add,subtract,multiply,divide, etc. - String Functions: Various string manipulation operations
- Object Functions: Functions for working with
Plan,Column,Course, andRequirementobjects
Requirement Types
BtLL includes a specialized type system for representing academic requirements. All requirement types extend a base Requirement type and automatically compute their result field based on their specific logic.
Base Requirement Type
The base Requirement type contains three fields that all requirement types inherit:
| Field | Type | Description |
|---|---|---|
result | boolean | Whether the requirement is satisfied |
description | string | Human-readable description of the requirement |
type | string | The specific requirement type name |
Requirement req (true, "Example requirement")
Extended Requirement Types
BtLL provides six specialized requirement types that extend the base Requirement:
BooleanRequirement
A simple requirement based on a boolean value. The result is set directly from the value field.
| Additional Field | Type | Description |
|---|---|---|
value | boolean | The boolean value determining if the requirement is met |
BooleanRequirement req BooleanRequirement(is_satisfied, "Must complete orientation")
NCoursesRequirement
A requirement that is satisfied when a minimum number of courses are completed. The result is true when length(courses) >= required_count.
| Additional Field | Type | Description |
|---|---|---|
courses | List<Course> | List of courses that count toward this requirement |
required_count | number | Minimum number of courses required |
NCoursesRequirement req NCoursesRequirement(matching_courses, 3, "Complete 3 breadth courses")
CourseListRequirement
A requirement for completing a specific list of courses. The result is true when all entries in met_status are true.
| Additional Field | Type | Description |
|---|---|---|
required_courses | List<Course> | The specific courses required |
met_status | List<boolean> | Completion status for each required course |
CourseListRequirement req CourseListRequirement(required, status_list, "Complete core courses")
AndRequirement
A composite requirement that is satisfied when ALL sub-requirements are met. The result is true when every requirement in the list has result == true.
| Additional Field | Type | Description |
|---|---|---|
requirements | List<Requirement> | List of requirements that must all be satisfied |
AndRequirement req AndRequirement([req1, req2, req3], "Complete all of the following")
OrRequirement
A composite requirement that is satisfied when ANY sub-requirement is met. The result is true when at least one requirement in the list has result == true.
| Additional Field | Type | Description |
|---|---|---|
requirements | List<Requirement> | List of requirements where at least one must be satisfied |
OrRequirement req OrRequirement([option_a, option_b], "Complete one of the following")
NumberRequirement
A requirement comparing numeric values. The result is true when actual >= required.
| Additional Field | Type | Description |
|---|---|---|
actual | number | The current value (e.g., units completed) |
required | number | The minimum required value |
NumberRequirement req NumberRequirement(total_units, 120, "Complete 120 units")
Accessing Requirement Fields
All requirement fields can be accessed using the get_attr function:
boolean is_met get_attr(my_requirement, "result")
string desc get_attr(my_requirement, "description")
number needed get_attr(unit_req, "required")
Example Program
Here's a complete example demonstrating BtLL syntax:
Function<boolean>(number) is_even (n) {
    number remainder mod(n, 2)
    boolean return equal([remainder, 0])
}

Function<number>(number, number) add_numbers (acc, n) {
    number return add([acc, n])
}

Function<boolean>() main () {
    List<number> numbers [1, 2, 3, 4, 5, 6, 7, 8]
    List<number> evens filter(numbers, is_even)
    number sum reduce(evens, add_numbers, 0)
    boolean return equal([sum, 20])
}
Next Steps
The following features are planned for future releases:
- Verbosity Fixes: The language is unnecessarily verbose in a handful of places
- Performance Improvements: Decrease checks to optimize performance
Getting Started
To use BtLL in your project, import the interpreter:
import { init } from "@repo/BtLL";

const code = `
Function<number>() main () {
    number result add([1, 2, 3])
    number return result
}
`;

const result = init(code);
console.log(result); // 6
A value of any type can be returned by the main function.
@repo/common
The @repo/common package contains shared database models, TypeScript types, and utility functions used across the backend and datapuller applications.
Local Development
This package is automatically built as part of the Turborepo build pipeline. No separate build step is required for local development.
Structure
packages/common/
├── src/
│   ├── models/           # Mongoose models and TypeScript interfaces
│   │   ├── class.ts
│   │   ├── course.ts
│   │   ├── section.ts
│   │   ├── term.ts
│   │   ├── user.ts
│   │   ├── rating.ts
│   │   ├── grade-distribution.ts
│   │   ├── schedule.ts
│   │   ├── plan.ts
│   │   └── ...
│   ├── utils/            # Shared utility functions
│   │   └── grade-distribution.ts
│   ├── lib/              # Common library functions
│   │   ├── common.ts
│   │   └── sis.ts
│   └── index.ts          # Package entrypoint
└── package.json
Usage
Import models and types from the package:
import { CourseModel, ICourseItem, ClassModel, IClassItem } from "@repo/common";

// Query courses
const courses = await CourseModel.find({ subject: "COMPSCI" });

// Use TypeScript interfaces
const course: ICourseItem = {
  // ...
};
Database Models
Each model file typically contains:
- TypeScript interfaces - Define the shape of documents
- Mongoose schema - Define validation and structure
- Database indexes - Optimize query performance
- Mongoose model - Export the model for querying
Example model structure:
// Interface for the document
export interface ITermItem {
  termId: string;
  name: string;
  // ...
}

// Mongoose schema
const termSchema = new Schema<ITermItem>({
  termId: { type: String, required: true },
  name: { type: String, required: true },
  // ...
});

// Database indexes
termSchema.index({ termId: 1 }, { unique: true });

// Export model
export const TermModel: Model<ITermItem> = model<ITermItem>("Term", termSchema);
Available Models
| Model | Description |
|---|---|
ClassModel | Individual class offerings per semester |
CourseModel | Course information (subject, number, title, description) |
SectionModel | Class sections with meetings and instructors |
TermModel | Academic terms and sessions |
UserModel | User accounts and authentication |
RatingModel | Course ratings submitted by students |
GradeDistributionModel | Historical grade distributions |
ScheduleModel | User-created schedules |
PlanModel | Multi-year academic plans |
EnrollmentHistoryModel | Enrollment data over time |
CollectionModel | User-curated course collections |
@repo/theme
The @repo/theme package is Berkeleytime's React design system built on Radix UI primitives. It provides reusable, accessible components with consistent styling across all frontend applications.
Components can be viewed on Storybook
Local Development
The theme package is used by frontend applications. Changes are reflected immediately when running in development mode.
To view components in isolation, use Storybook:
# Start Storybook (available at localhost:3005)
docker compose up storybook
Structure
packages/theme/
├── src/
│   ├── components/           # React components
│   │   ├── ThemeProvider/    # Root theme provider
│   │   ├── Button/
│   │   ├── Dialog/
│   │   ├── Tooltip/
│   │   ├── Select/
│   │   └── ...
│   ├── contexts/             # React contexts
│   ├── hooks/                # Custom React hooks
│   └── index.ts              # Package entrypoint
└── package.json
Usage
Wrap your application with ThemeProvider and import components:
import { ThemeProvider, Button, Dialog, Tooltip } from "@repo/theme";

function App() {
  return (
    <ThemeProvider>
      <Button variant="primary">Click me</Button>
    </ThemeProvider>
  );
}
Theme Support
The design system supports light and dark themes. Color tokens automatically respond to the selected theme:
// Using theme-aware colors in SCSS
.my-component {
  color: var(--foreground-color);
  background: var(--background-color);
  border-color: var(--border-color);
}
Theme selection is persisted and respects system preferences when no preference is set.
Core Dependencies
| Dependency | Purpose |
|---|---|
radix-ui | Unstyled, accessible UI primitives |
@radix-ui/themes | Pre-built Radix theme components |
iconoir-react | Icon library |
cmdk | Command palette component |
classnames | Conditional CSS class utility |
Available Components
The package exports components for common UI patterns:
- Layout:
ThemeProvider,Container,Card - Forms:
Button,Input,Select,Checkbox,RadioGroup - Feedback:
Dialog,Toast,Tooltip,Alert - Navigation:
Tabs,DropdownMenu,NavigationMenu - Data Display:
Table,Badge,Avatar
See the full list in packages/theme/src/components/.
@repo/shared
The @repo/shared package contains shared utilities, constants, and configurations used across both frontend and backend applications.
Local Development
This package is automatically available to all apps in the monorepo. No separate build step is required.
Structure
packages/shared/
├── index.ts              # Package entrypoint
├── metrics.ts            # Rating metric definitions
├── ratingsConfig.ts      # Rating system configuration
├── queries.ts            # Shared GraphQL queries
└── staff.ts              # Staff-related utilities
Usage
import { MetricName, METRIC_MAPPINGS, METRIC_ORDER } from "@repo/shared";

// Access metric configuration
const usefulnessConfig = METRIC_MAPPINGS[MetricName.Usefulness];
console.log(usefulnessConfig.tooltip);
// "This refers to how beneficial the course is..."

// Get status label from average rating
const status = usefulnessConfig.getStatus(4.5);
// "Very Useful"
Rating Metrics
The package defines the rating metrics used throughout Berkeleytime:
| Metric | Description | Rating Scale |
|---|---|---|
Usefulness | Course benefit for growth | Very Useful → Not Useful |
Difficulty | Challenge level | Very Hard → Very Easy |
Workload | Time/effort required | Very Heavy → Very Light |
Attendance | Attendance requirement | Required / Not Required |
Recording | Lecture recording availability | Recorded / Not Recorded |
Recommended | Overall recommendation | Recommended / Not Recommended |
Metric Configuration
Each metric includes:
tooltip- Description shown to usersgetStatus(avg)- Converts numeric average to display labelisRating- Whether it uses a 1-5 rating scaleisInverseRelationship- Whether lower values are "better"
export const METRIC_MAPPINGS = {
  [MetricName.Usefulness]: {
    tooltip: "This refers to how beneficial the course is...",
    getStatus: (avg: number) =>
      avg >= 4.3 ? "Very Useful" : avg >= 3.5 ? "Useful" : /* ... */,
    isRating: true,
    isInverseRelationship: false,
  },
  // ...
};
Shared Queries
The queries.ts file contains GraphQL queries that are used by both the frontend codegen and potentially other applications, ensuring query consistency across the codebase.
@repo/gql-typedefs
The @repo/gql-typedefs package contains the GraphQL type definitions (schemas) shared across the backend and frontend applications. These definitions serve as the single source of truth for the GraphQL API schema.
Local Development
When modifying GraphQL schemas, you need to regenerate types in both the backend and frontend. This can be done with a single command:
npx turbo run generate
Structure
packages/gql-typedefs/
├── index.ts              # Package entrypoint (re-exports all typedefs)
├── common.ts             # Common types (scalars, enums)
├── course.ts             # Course-related types
├── class.ts              # Class-related types
├── section.ts            # Section types
├── term.ts               # Term types
├── user.ts               # User types
├── rating.ts             # Rating types
├── enrollment.ts         # Enrollment types
├── grade-distribution.ts # Grade distribution types
├── schedule.ts           # Schedule types
├── plan.ts               # Academic plan types
├── collection.ts         # Collection types
├── catalog.ts            # Course catalog types
├── analytics.ts          # Analytics types
└── ...
Usage
The type definitions are written using the gql template literal tag:
// packages/gql-typedefs/course.ts
import { gql } from "graphql-tag";

export const courseTypeDefs = gql`
  type Course {
    courseId: CourseIdentifier!
    subject: String!
    number: CourseNumber!
    title: String!
    description: String
    units: Float
    gradeDistribution: GradeDistribution
  }

  type Query {
    course(subject: String!, number: CourseNumber!): Course
    courses: [Course!]!
  }
`;
How It Works
- Schema Definition: Type definitions are written in GraphQL SDL format
- Frontend Codegen: The frontend's
codegen.tsreads these schemas and generates TypeScript types for queries - Backend Codegen: The backend's
codegen.tsgenerates resolver types from these schemas
┌─────────────────────┐
│  @repo/gql-typedefs │
│   (GraphQL SDL)     │
└──────────┬──────────┘
           │
     ┌─────┴─────┐
     ▼           ▼
┌─────────┐ ┌─────────┐
│ Backend │ │Frontend │
│ codegen │ │ codegen │
└────┬────┘ └────┬────┘
     ▼           ▼
┌─────────┐ ┌─────────┐
│Resolver │ │ Query   │
│ Types   │ │ Types   │
└─────────┘ └─────────┘
Adding New Types
- Create or modify a type definition file in
packages/gql-typedefs/ - Export it from
index.tsif it's a new file - Run codegen in both backend and frontend
- Implement the resolver in the backend
- Use the generated types in the frontend
tip
Keep related types together in the same file. For example, all enrollment-related types should be in enrollment.ts.
@repo/sis-api
The @repo/sis-api package contains auto-generated TypeScript clients for UC Berkeley's Student Information System (SIS) APIs. These clients are used by the datapuller to fetch course, class, and term data.
Local Development
The API clients are pre-generated from OpenAPI specifications. To regenerate after spec updates:
cd packages/sis-api && npm run build
warning
The SIS API specs are rate-limited. Specs are stored locally in the specs/ directory rather than fetched at build time.
Structure
packages/sis-api/
├── src/
│   └── index.ts          # Generation script
├── specs/                # OpenAPI specification files
│   ├── courses.json
│   ├── classes.json
│   └── terms.json
├── dist/                 # Generated TypeScript clients
│   ├── courses.ts
│   ├── classes.ts
│   └── terms.ts
└── package.json
Usage
Import and use the generated API clients:
import { CoursesAPI } from "@repo/sis-api/courses";
import { ClassesAPI } from "@repo/sis-api/classes";
import { TermsAPI } from "@repo/sis-api/terms";

// Initialize client with API credentials
const coursesApi = new CoursesAPI({
  headers: {
    "app_id": process.env.SIS_APP_ID,
    "app_key": process.env.SIS_APP_KEY,
  },
});

// Fetch courses
const response = await coursesApi.getCourses({
  "subject-area-code": "COMPSCI",
});
Generation Process
The package uses swagger-typescript-api to generate TypeScript clients from OpenAPI specifications:
import { generateApi } from "swagger-typescript-api";

generateApi({
  fileName: `${name}.ts`,
  output: path.resolve(process.cwd(), "./dist"),
  input: path.resolve(process.cwd(), "./specs", spec),
  singleHttpClient: false,
  apiClassName: `${name[0].toUpperCase()}${name.slice(1)}API`,
});
Available APIs
| API | Description | Primary Use |
|---|---|---|
CoursesAPI | Course catalog data | Course information, descriptions, prerequisites |
ClassesAPI | Class offerings | Sections, instructors, meeting times |
TermsAPI | Academic terms | Term dates, sessions |
API Credentials
Access to SIS APIs requires credentials from UC Berkeley's API Central:
SIS_APP_ID- Application identifierSIS_APP_KEY- Secret key
These are configured in the environment and should never be committed to version control.
note
For more information about data sources and API access, see the Data documentation.
@repo/eslint-config
The @repo/eslint-config package provides shared ESLint configuration for all applications and packages in the monorepo.
Local Development
This package is used as a dev dependency. No build step is required.
Structure
packages/eslint-config/
├── index.mjs             # Main configuration file
└── package.json
Usage
Reference the config in your app's eslint.config.mjs:
import baseConfig from "@repo/eslint-config";

export default [
  ...baseConfig,
  // Add app-specific overrides here
];
Included Rules
The configuration includes:
| Plugin | Purpose |
|---|---|
@eslint/js | Core JavaScript rules |
typescript-eslint | TypeScript-specific rules |
eslint-config-prettier | Disables formatting rules (handled by Prettier) |
eslint-plugin-react-hooks | React Hooks rules |
eslint-plugin-react-refresh | React Fast Refresh compatibility |
eslint-plugin-css-modules | CSS Modules best practices |
IDE Integration
For the best development experience, install the ESLint extension:
- VSCode: ESLint Extension
This enables real-time linting and auto-fix on save.
Running Lint
# Lint a specific app
cd apps/frontend && npm run lint

# Lint the entire monorepo
npm run lint
@repo/typescript-config
The @repo/typescript-config package provides shared TypeScript configuration presets for all applications and packages in the monorepo.
Local Development
This package is used as a dev dependency. No build step is required.
Structure
packages/typescript-config/
├── base.json             # Base configuration (shared settings)
├── node.json             # Node.js applications (backend, datapuller)
├── react.json            # React applications (deprecated, use vite.json)
├── vite.json             # Vite + React applications (frontend)
└── package.json
Usage
Extend the appropriate config in your app's tsconfig.json:
{
  "extends": "@repo/typescript-config/vite.json",
  "compilerOptions": {
    "baseUrl": ".",
    "paths": {
      "@/*": ["./src/*"]
    }
  },
  "include": ["src"]
}
Available Configs
| Config | Use Case |
|---|---|
base.json | Shared settings inherited by all configs |
node.json | Backend services and Node.js packages |
vite.json | Vite-based React applications |
react.json | Legacy React config (prefer vite.json) |
Base Configuration
The base config includes settings for:
- Strict Type Checking: Enables strict mode and additional checks
- Module Resolution: Uses bundler-style resolution
- Interop: Enables ES module interoperability
- CSS Modules: Includes plugin for CSS module type support
Included Plugins
| Plugin | Purpose |
|---|---|
typescript-plugin-css-modules | Provides type definitions for CSS module imports |
This plugin enables autocomplete and type checking for SCSS/CSS module classes:
import styles from "./Component.module.scss";

// TypeScript knows about available class names
<div className={styles.container} />
IDE Integration
For full TypeScript support, ensure your IDE uses the workspace TypeScript version:
- VSCode: The workspace is configured to use the local TypeScript version automatically
LLM Use & Vibecoding
This repo is set up to work well with AI-assisted development. Cursor, Claude Code, and other AI agents can be extremely helpful for navigating the codebase, implementing features, and refactoring—if you use them deliberately. In fact, in my experience, AI agents can help at least lay the groundwork for almost anything.
Repo Features for AI-Assisted Development
Cursorrules (.cursorrules)
The repo includes a .cursorrules file at the repo root. It describes:
- Architecture: Monorepo layout (apps, packages, infra), backend module structure, frontend folder layout.
- Tech stack: Backend (Node, Express, Apollo, MongoDB, Redis), frontend (React, Vite, Apollo, SCSS modules), and shared packages.
- Conventions: TypeScript/GraphQL usage, SCSS modules, file naming, where to put new code.
- Workflow: Type generation, lint/format, Docker, Turbo commands.
When you (or an agent) work in this repo, Cursor and other tools that read .cursorrules get this context automatically. That reduces wrong-path suggestions (e.g. putting resolvers in the wrong place or editing generated types). Keep .cursorrules updated when the project's patterns change.
Git Worktree Support & Parameterized Ports
You can run multiple copies of the repo side-by-side (e.g. different branches or experiments) using git worktrees. To avoid port clashes, the stack uses a parameterized port prefix.
DEV_PORT_PREFIX(default30) controls the first two digits of dev ports. Services end up on30XX(e.g. frontend/API on 3000, MongoDB on 3008). See Local Development - Ports.- For a second worktree, set a different prefix before starting Docker, for example:
That worktree will use ports 80XX instead of 30XX.DEV_PORT_PREFIX=80 docker compose up -d
So you can:
- Work in the main repo at
30XX. - In another worktree (e.g. a feature branch), run with
DEV_PORT_PREFIX=80and use80XXfor the same services.
Note: Only
30and80are fully supported today; other prefixes may require updating OAuth redirect URIs and similar config. See Local Development.
Using worktrees + parameterized ports lets you and agents iterate in a separate branch without stopping your primary dev environment, and keeps docs/compose behavior consistent across copies.
Vibecoding Maturely
"Vibecoding" here means leaning on AI to write or edit code while you stay in control. Doing it maturely means you always know what code you're shipping and you treat the agent as a fast, context-aware pair programmer—not a black box. These days, it's easy to ship fast. What's difficult is shipping good quality code and avoiding code debt. Here are some of the things that have worked for me.
Prompt Agents in Ways You Expect
- Specify files and scope. Say things like "add a resolver in
apps/backend/src/modules/rating/resolver.ts" or "create a new component inapps/frontend/src/components/" instead of "add a rating feature." - Describe broad architecture. e.g. "Create a model that contains X, Y, and Z as fields. Then, create one endpoint to create entries, and another to join Y with model A and return the results."
- Reference the repo. Point to existing examples: "Same pattern as the enrollment module" or "Use the same SCSS module setup as
RatingButton." - Constrain edits. "Only change the backend; don't touch the frontend" or "Don't modify anything in
generated-types/."
With specific prompts, we risk sacrificing a potentially more optimal solution an LLM could have come up with. However, it ensures that you fully understand how everything works, which makes future development significantly easier. Also, a lot of the time LLMs will not know your priorities or the specific use-cases you need to optimize for. You should inform it.
Review Your The Outputted Code
- Read the diff. Before committing or pushing, review every change. If you don't understand a line, ask the agent to explain or simplify.
- Understand the architecture. Look through the files or use the docs so you know where things live (modules,
lib/api/, packages). If the agent suggests a file or pattern that doesn't match, correct it. - Own the behavior. You are responsible for what the code does. The agent suggests; you decide.
Always Test
- Run the app. After agent-generated changes, use the feature yourself (run the frontend, hit the backend, run the datapullers locally etc.)
- Use the existing pipeline. Run type-check, lint, and build (
npm run type-check,npm run lint,npm run build/ Turbo) and fix any failures. This is also done automatically pre-push.
Never Settle
- Reject wrong patterns. If the agent suggests editing generated code, adding a one-off hack, or breaking the module/GraphQL conventions, ask for a correction or rewrite the change yourself. Please be very careful with this.
- Iterate on quality. If the first suggestion is messy or unclear, ask for a refactor, better names, or a smaller change set.
- Keep the bar high. The goal is maintainable, readable code that fits the repo. Don't merge "good enough" if it would confuse the next developer or the next agent.
In short: use AI to move faster and stay consistent with the repo's structure and conventions. Pair that with clear prompts, a solid mental model of the codebase, and a habit of testing and reviewing—so you're always shipping code you understand and stand behind.
A good rule of thumb is to never ask an LLM to edit code you don't understand or produce code you don't understand.
DeCal Classes
Berkeleytime has first‑class support for DeCal classes. This feature enriches the standard SIS data with details from the DeCal board so students can see accurate DeCal titles, descriptions, application links, deadlines, and contact information directly in the class catalog and class view.
High‑level flow
- The
decalsdatapuller scrapes the DeCal board API and normalizes each listing into a structuredDeCalCourse. - For each DeCal course, we try to match it to an existing
ClassModelin Mongo using a set of heuristics (title similarity, meeting times, room, and faculty sponsor). - When we find a confident match, we write a
decalsub‑object onto thatClassModel. - Backend GraphQL resolvers expose this data via the
Class.decalfield. - The frontend reads
Class.decaland:- shows a “DeCal” badge in the catalog,
- uses the DeCal title on catalog cards and the class overview header,
- and surfaces application, syllabus, deadline, and contact information in the overview tab.
Scraping and normalization
The DeCal puller lives in apps/datapuller/src/pullers/decals.ts. It talks directly to the DeCal board’s JSON APIs (for example, the approved‑courses endpoint) instead of scraping HTML, then normalizes responses into an internal DeCalCourse shape:
- core metadata:
title,semester,department,category,units - sections: day/time, room, capacity, and section type
- descriptive content:
description,enrollmentInformation,websiteUrl,syllabusUrl - application metadata:
applicationUrl,applicationDueDate - facilitators:
{ name, email }
For development and debugging, the puller can persist the raw DeCal payloads into apps/datapuller/data/decals.json. When the DEBUG flag in the puller is enabled, subsequent runs will re‑use this local file instead of repeatedly calling the remote APIs. This makes it much easier to refine matching heuristics offline.
Matching DeCals to SIS classes
The DeCal board does not expose Berkeleytime class identifiers, so we have to infer the correct ClassModel for each DeCal. The puller uses a multi‑step scoring heuristic:
-
Term bucketing
DeCals are grouped by semester key (for example,"Spring 2026"). For each group we only consider classes from the matching Berkeleytime term, which keeps the candidate set small and avoids cross‑term matches. -
Department narrowing
If the DeCal has a department, we first search only within classes from that department. If no reasonable candidate appears, we fall back to searching across all departments for that term. -
Title similarity (fuzzy search)
We build aFuzzySearchindex of candidate classes using course and class titles. For each DeCal title we:- compute a fuzzy similarity score against each candidate,
- discard clearly unrelated classes below a minimum score,
- and keep only the top‑scoring subset for more expensive checks.
-
Meeting‑time and room heuristics
From the DeCal sections we derive normalized “day + time” strings and room identifiers, handling different display formats. For each candidate class:- we normalize its primary‑section meetings into the same representation,
- award positive score if any meeting time appears in the DeCal’s time set,
- and add extra score if the room or location text matches (for example, same building and room number).
-
Faculty / sponsor similarity
When a DeCal lists a faculty sponsor, we normalize the sponsor name and compare it to instructor names on each candidate class. If the sponsor appears to teach the candidate, we increase that candidate’s score. -
Composite score and decision
Each candidate gets a composite score that combines:- title similarity,
- meeting‑time overlap,
- room overlap,
- and faculty‑name similarity.
The puller selects the single best candidate whose score exceeds a threshold. If there is a tie or no strong candidate, we log the DeCal and skip it rather than guessing.
Persisting DeCal metadata
Once a DeCal is matched to a ClassModel, we populate the decal field on that document:
title: DeCal‑specific course titledescription: extended DeCal descriptionsyllabusUrl: URL to the DeCal syllabusapplicationUrl: URL for the application form or course siteapplicationDueDate: application deadline as a stringinstructors: array of{ name, email }derived from facilitators
This data flows through the stack as follows:
- Backend formatters expose
Class.decalvia the GraphQL schema (packages/gql-typedefs/class.ts). - The canonical catalog query (
packages/shared/queries.ts) includesdecal { title }so catalog cards can show a “DeCal” badge and DeCal title. - The class details queries (
apps/frontend/src/lib/api/classes.ts) fetchdecalso the class overview can:- show a dedicated “DeCal Application” section (application link, syllabus link, and formatted deadline),
- prefer the DeCal description over SIS description when present,
- hide SIS “Class Notes” for DeCal classes,
- and render contact information as
Name: emailpairs.
Overall, the DeCal feature lets Berkeleytime present rich, up‑to‑date information for student‑run courses without requiring any manual data entry in our database.